Papercraft Projects · Upcycling Projects · Valentine's Day

DIY Woven Paper Heart

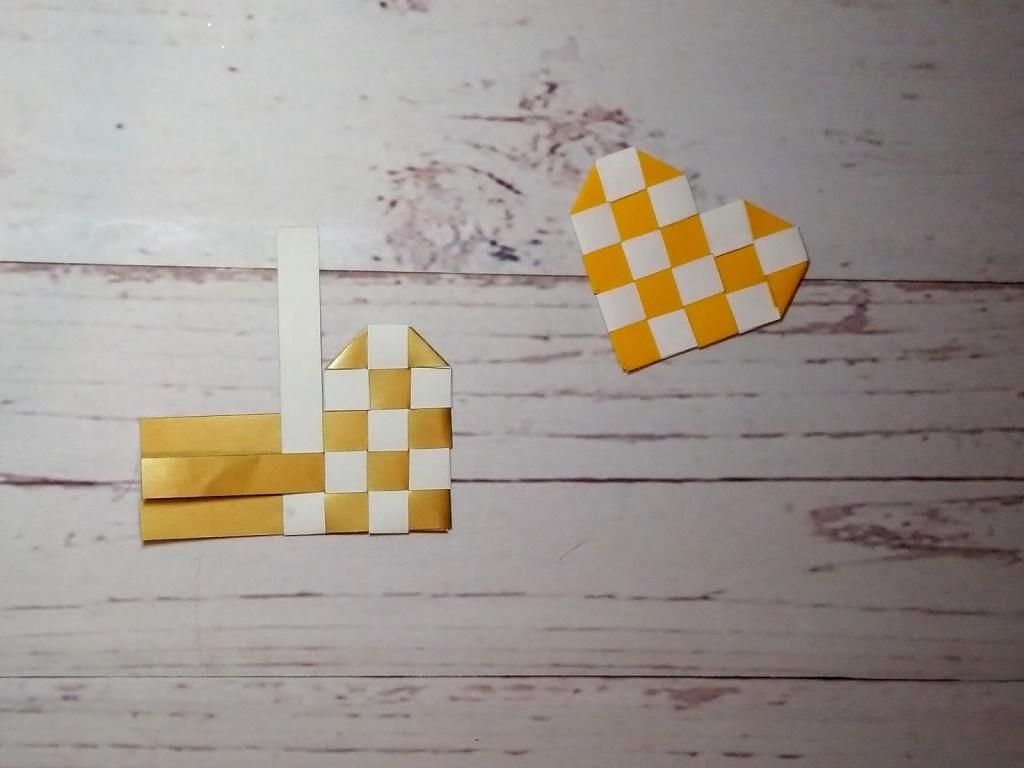
In this tutorial, you will discover how to turn an old envelope, or some scraps of paper, into a gorgeous woven paper heart! Perfect for Valentine’s Day, they are easy to make, and would look adorable attached to a card or gift for that special someone in your life!

How to Make a Woven Paper Heart

To make a paper heart, you will need:

* coloured paper (a different colour on each side works best for this) 80-90gsm recommended
* scissors / craft knife
* pencil
* ruler

You can watch my video tutorial to see me making one of these hearts, or follow the written instructions below:

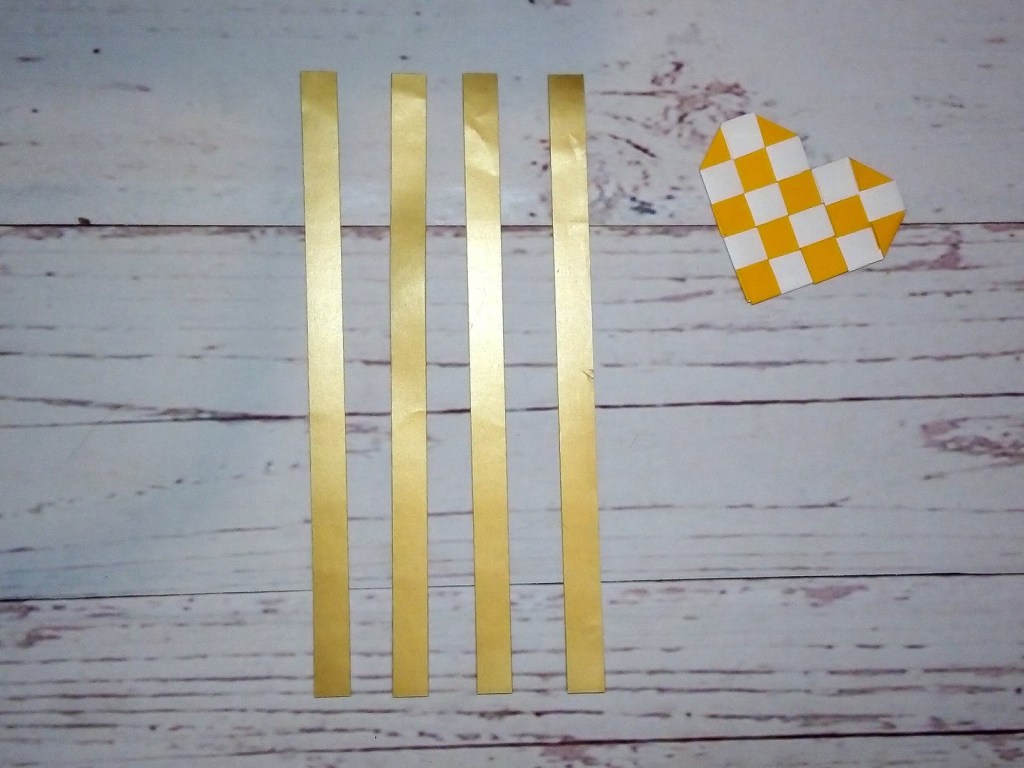
First, you will need to cut out four strips of paper, each one measuring 17cm x 1cm / 6.7″ x 0.4″. I’m reusing an old envelope for mine.

How to Make a Woven Paper Heart

Take one of the strips and fold it in half to make a crease. Open it out again and fold one end backwards to make an L shape, aligning the edge along the middle crease (see first example pictured below).

Fold the other end forwards and align it along the middle crease (see second example below). Press down firmly.

How to Make a Woven Paper Heart

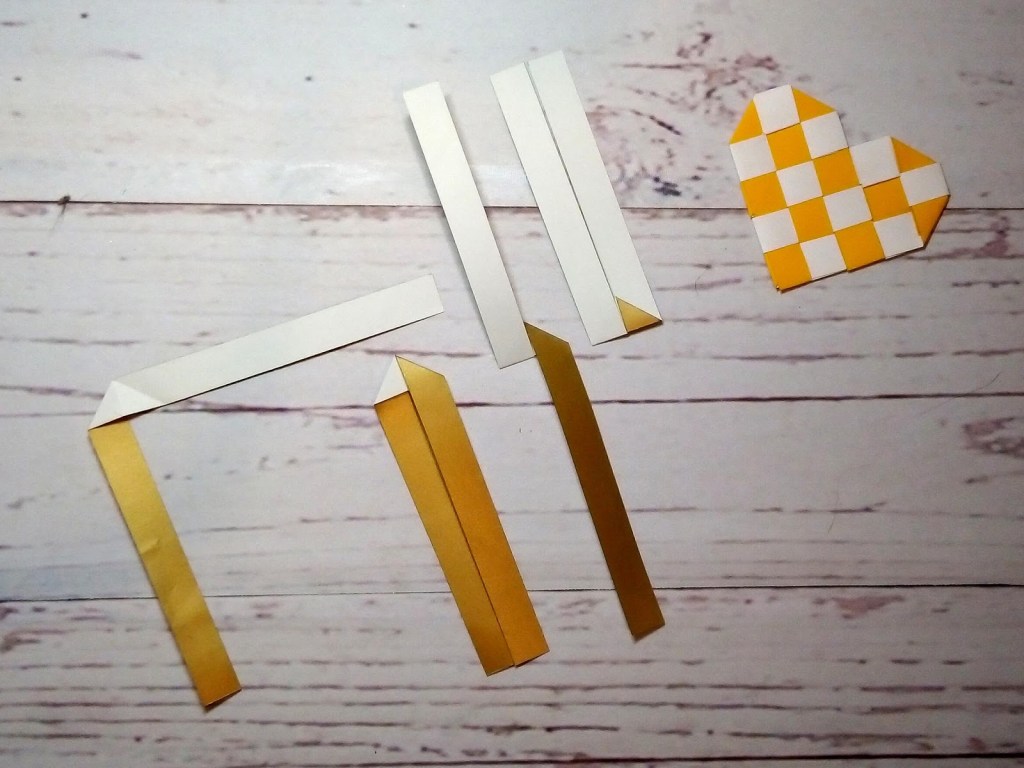
Fold the left hand end upwards, keeping it in front (see third example above) and the right hand end upwards, keeping it behind (see fourth example above). Make sure the long edges are neatly aligned, and press down firmly.

Repeat with the other three strips of paper.

How to Make a Woven Paper Heart

Next, interlock two of the pieces, making sure that one of them is back to front (showing a different colour, if you have one).

How to Make a Woven Paper Heart

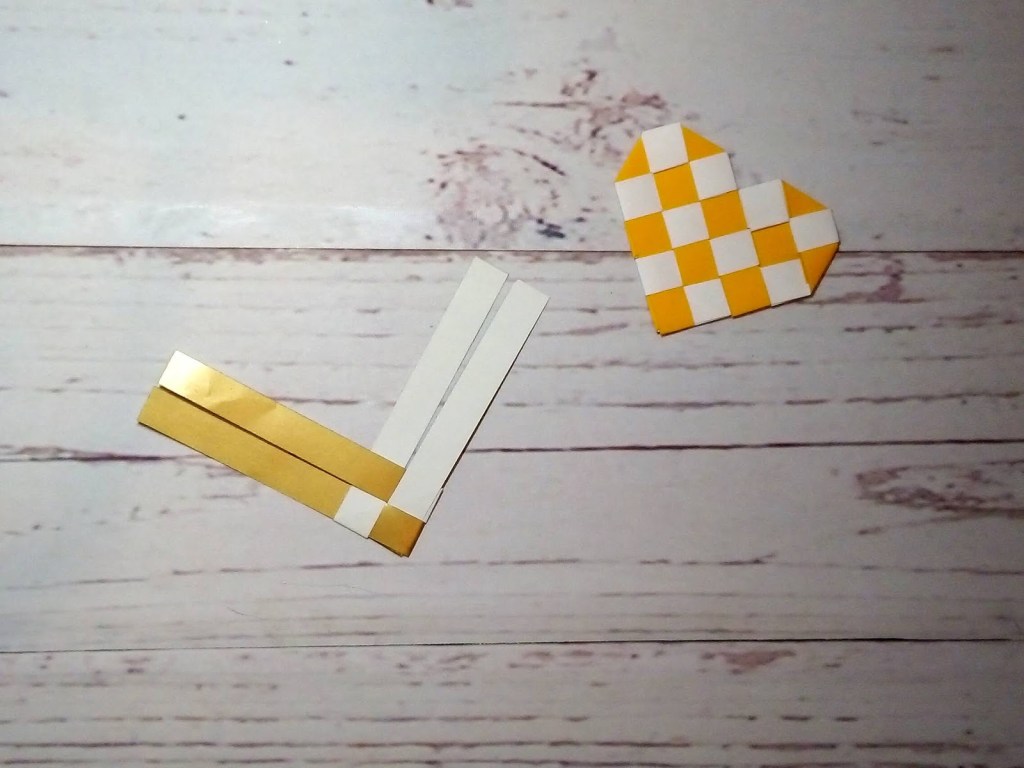
Then do the same with the other two pieces.

How to Make a Woven Paper Heart

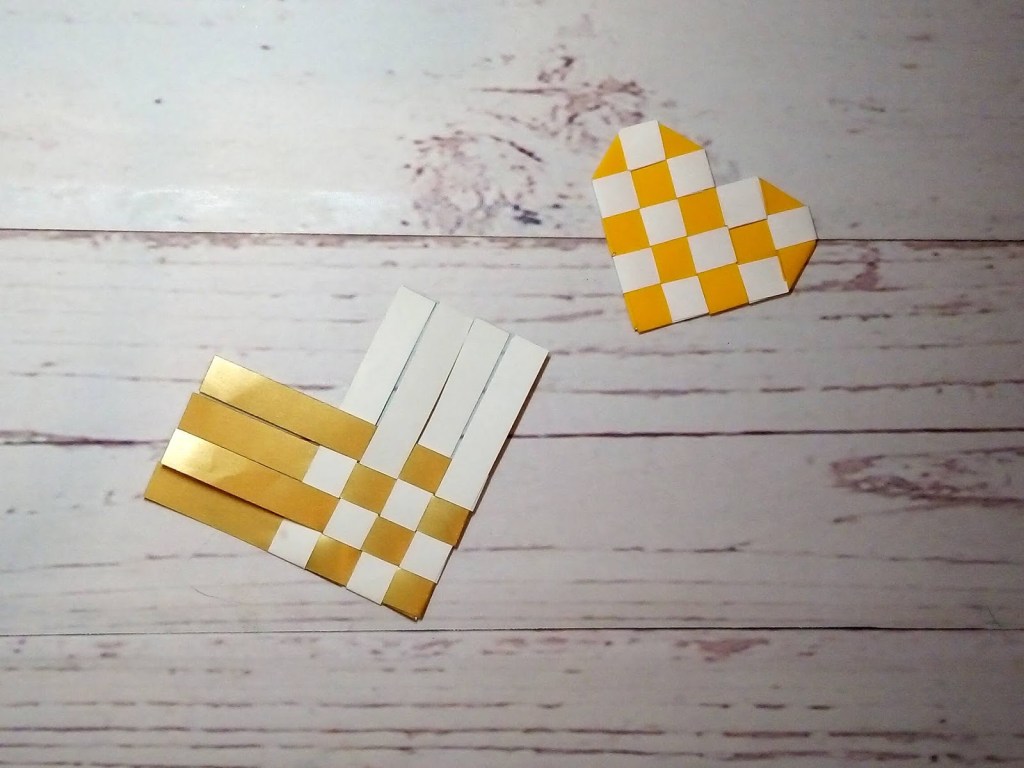
Fold the top (gold) strip down over itself.

How to Make a Woven Paper Heart

Then fold the second (white) strip to the right so that it runs parallel to the previous one you folded, and tuck it behind the the next (white) strip.

How to Make a Woven Paper Heart

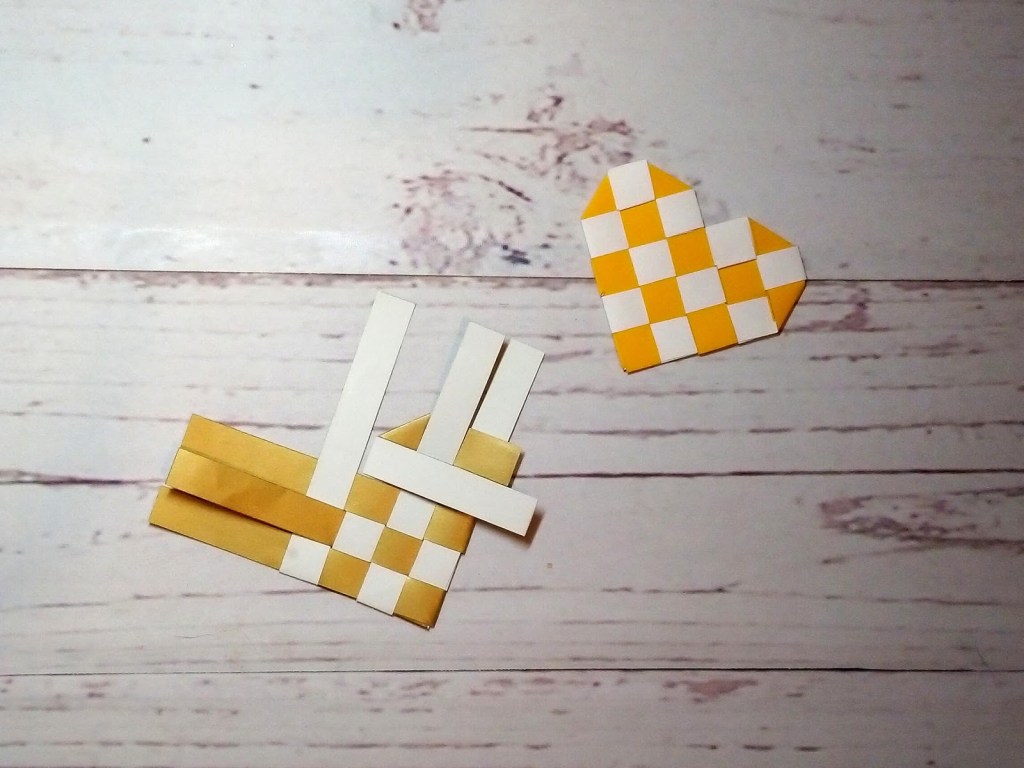
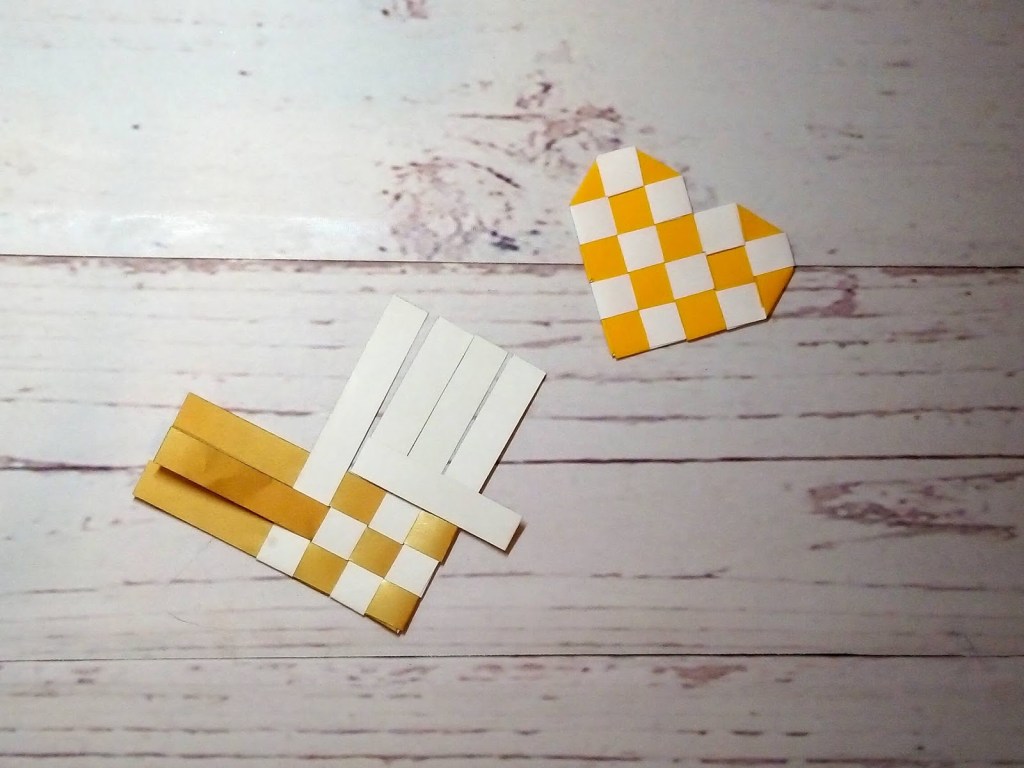
Cut the (white) folded strip as shown below and tuck it backwards under the (white) square beneath it.

How to Make a Woven Paper Heart

Cut the end off the (gold) strip, then fold the last (white) strip over it to the left. Tuck this neatly behind the middle (white) strip.

How to Make a Woven Paper Heart

Fold the middle (white) strip back, trim off the excess and tuck it backwards under the (white) square beneath it.

How to Make a Woven Paper Heart

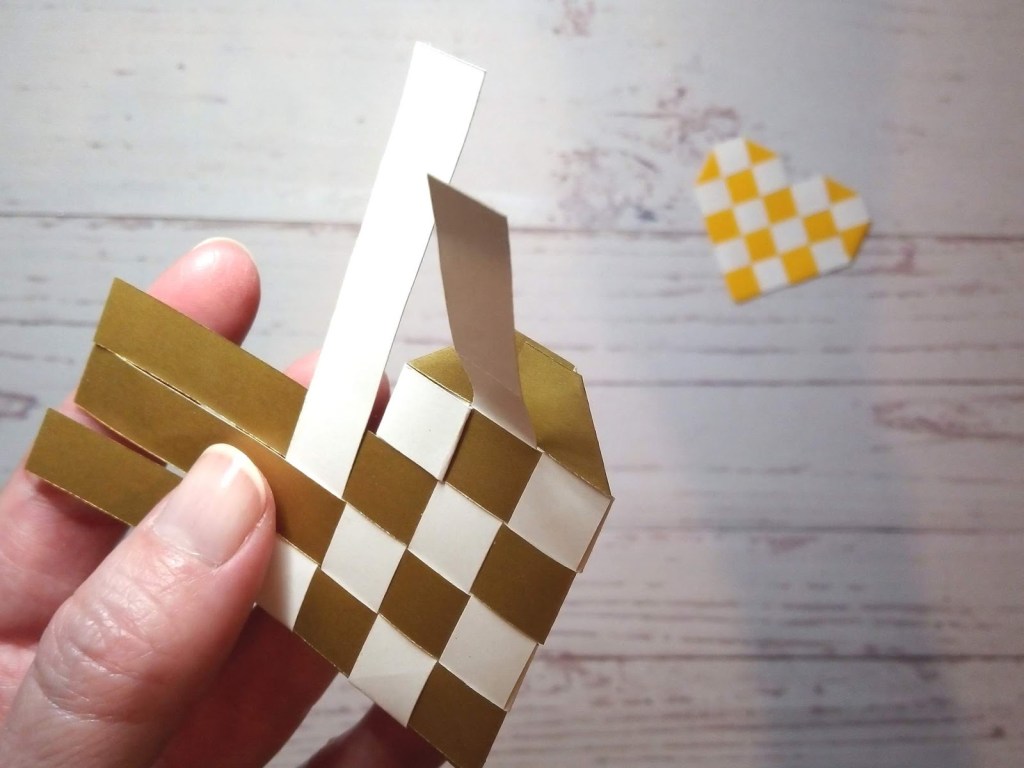
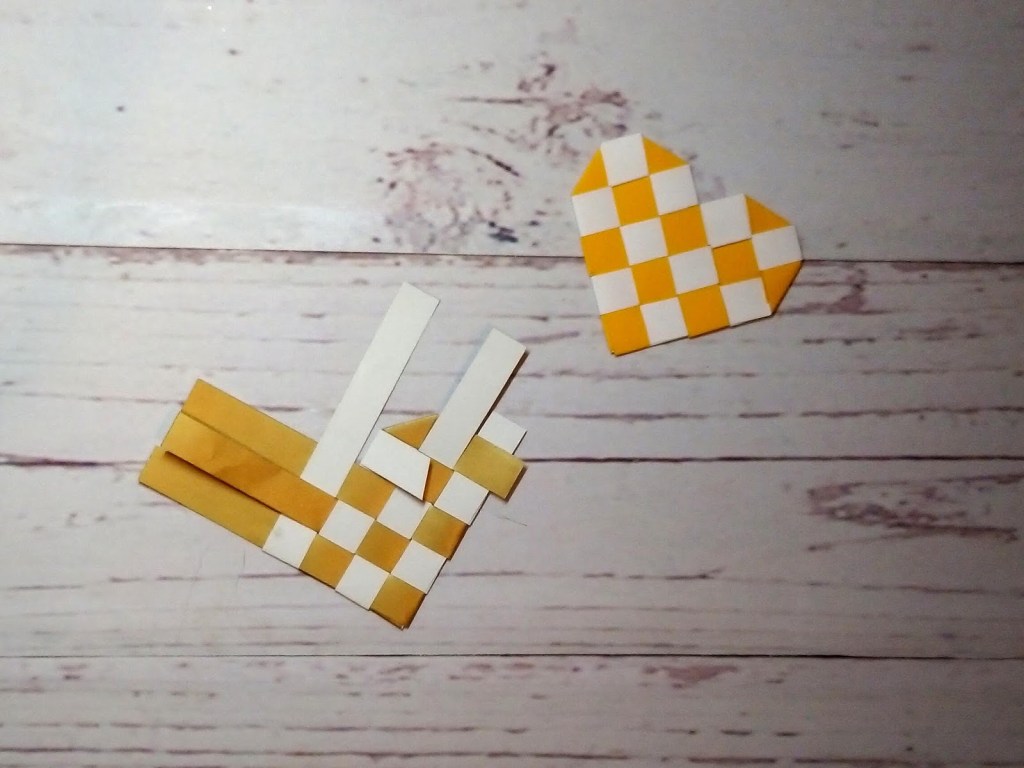
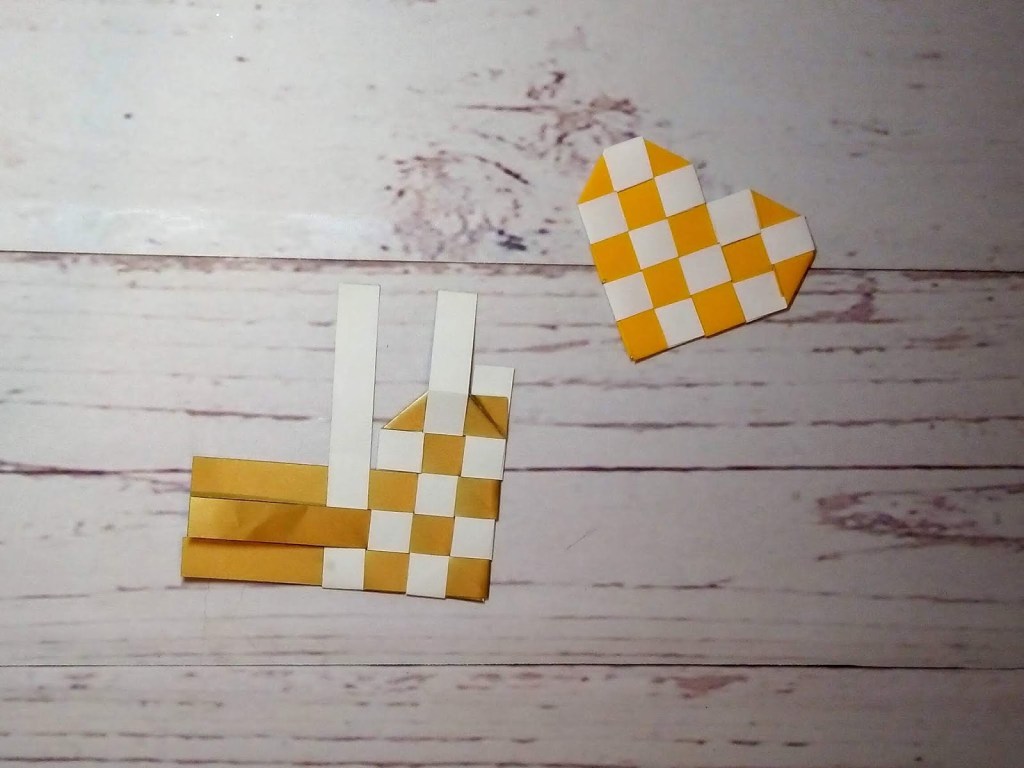
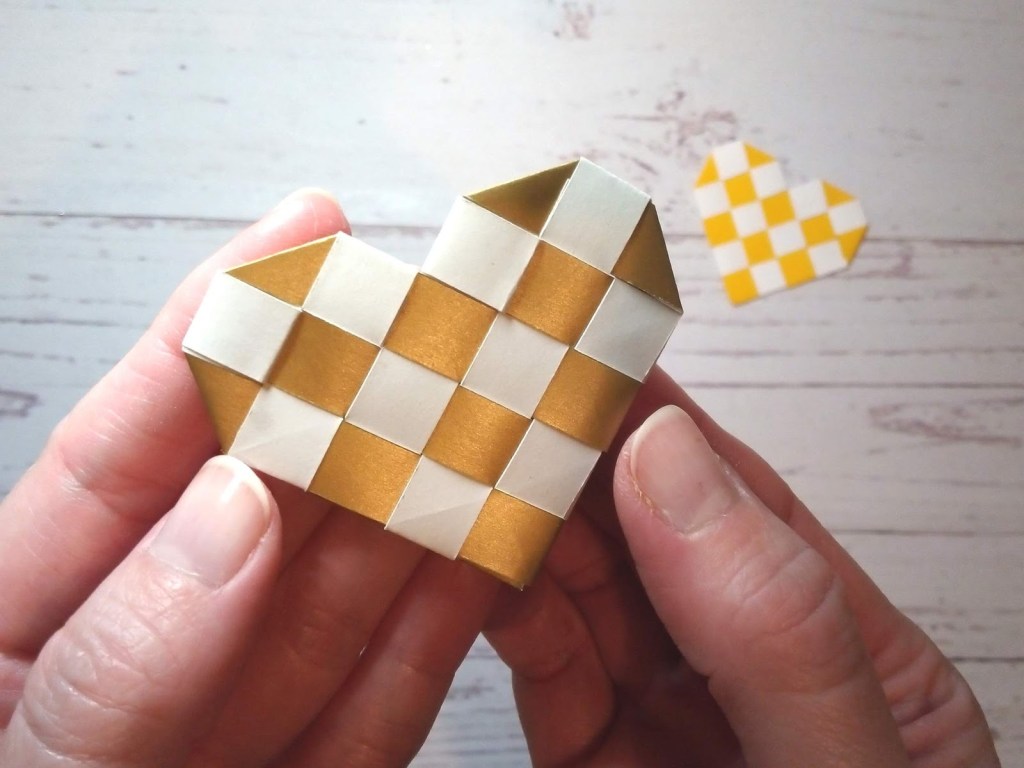
Repeat the process with the other side. I recommend turning the heart over so that you are working on the back of it.

How to Make a Woven Paper Heart

And here is the finished heart! All of the ends should be neatly tucked in and held in place, so there is no need for any glue.

How to Make a Woven Paper Heart

Will you have a go at making one of these adorable paper hearts? If so, what colours will you choose?

How to Make a Woven Paper Heart

Happy crafting! ❤️
Suzanne

3D Papercraft Projects · Upcycling Projects · Valentine's Day

DIY Upcycled Love Heart Gift Box

Welcome to another upcycling project! This time I am going to show you how to turn an empty cheese triangle box into a super cute love heart gift box, perfect for Valentine’s Day! ❤️

Upcycled Love Heart Gift Box for Valentine's Day

You can include your own personal message inside, then fill the box with chocolates or other small treats and present it to that special someone in your life! ❤️

To make one of these boxes, you will need:

  • an empty cheese triangle box
  • pencil
  • paper
  • scissors
  • craft knife
  • sandpaper
  • white acrylic paint
  • pastel acrylic paints
  • paintbrushes
  • lilac or pale purple Sharpie
  • gloss varnish (optional)
  • craft glue
  • thin ribbon

You can watch my video tutorial to see me making one of these boxes, or simply follow the written instructions below:

First, fold a 7.6cm x 7.6cm / 3″ x 3″ piece of paper in half and draw half a heart shape onto it (I used a square Post-it note for mine). Cut this template out and draw around it onto the lid of the cheese triangle box. Cut the heart shape out carefully using a craft knife.

Upcycled Love Heart Gift Box for Valentine's Day

Using sandpaper, smooth any rough edges from where you have just cut. Then cover the lid, base and the cut out heart shape in two layers of white acrylic paint.

Upcycled Love Heart Gift Box for Valentine's Day

Once dry, paint the pieces in a light, pastel colour.

Upcycled Love Heart Gift Box for Valentine's Day

Next, using the Sharpie (a lilac or pale purple works well for this), colour around the outline of the heart shape on the lid approximately 2-3mm thick. Then, using a pencil, sketch your personal message onto the heart and colour over it with the Sharpie. 

TIP : Leave it to dry, then apply a thin coat of clear acrylic gloss varnish to the painted pieces.

Upcycled Love Heart Gift Box for Valentine's Day

You really don’t have to be neat when doing the lettering as on the actual Love Heart sweets the purple is quite blotchy.

Love Hearts

Glue the heart into the centre of the base, carefully lining it up so that it is visible when the lid is on.

Upcycled Love Heart Gift Box for Valentine's Day

Next, take some thin ribbon (or a thin strip of paper) and glue it around the middle of the base as shown below. This helps to neaten up the edges.

Upcycled Love Heart Gift Box for Valentine's Day

Press some tissue paper into the base and fill it with treats!

Upcycled Love Heart Gift Box for Valentine's Day

Upcycled Love Heart Gift Box for Valentine's Day

When the treats are taken out and the tissue paper is removed, your special personal message is revealed!

Upcycled Love Heart Gift Box for Valentine's Day

I really hope you enjoyed this cute Valentine’s Day upcycling project! ❤️ Once you’ve finished with the box, why not try popping a photograph inside it and hanging it on the wall as a photo frame

How to Make an Upcycled Love Heart Gift Box for Valentine's Day

Happy crafting and happy upcycling!
Suzanne

3D Papercraft Projects · Christmas Papercraft · Upcycling Projects

DIY Upcycled Christmas Card Baubles

I’m a bit of a hoarder when it comes to paper craft. I’m always keeping old greeting cards, packaging, envelopes and even used Advent calendars and Christmas crackers – anything made of paper or card that I might be able to reuse. I have a stack of old Christmas cards that I’ve been slowly going through, and a few years ago I created these super cute Christmas card baubles!

Upcycled Christmas Card Baubles as Hanging Decorations

Aren’t they fabulous!?

They are so easy to make, and the best thing is you can use any materials left over from Christmas to decorate them, including ribbon bows, sparkly gems, stickers, etc.

To make one, you will need:

  • used Christmas cards / old Advent calendar / glittery card crackers
  • circle punch (I used a 1.5″ scalloped edge craft punch)
  • pencil
  • ruler
  • scissors
  • strong craft glue
  • thread, string, ribbon or wool for hanging

Watch my video tutorial to see me making one, or simply follow the written instructions below:

To begin, you will need to cut (punch) out twenty circles from the card (I’m using an old Advent calendar for this one). You could also draw around something circular for this, but they all need to be exactly the same size.

Upcycled Christmas Card Baubles as Hanging Decorations

Cut another circle from a scrap piece of paper and fold it in half. Fold it again into exact thirds and open it out. Draw a triangle where every other point meets, and cut this out (it should be an equilateral triangle).

Upcycled Christmas Card Baubles as Hanging Decorations

Using this triangle as a template, fold each of the twenty card circles as shown below. You could fold them against the edge of a ruler to make this easier.

Upcycled Christmas Card Baubles as Hanging Decorations

Next, arrange the twenty pieces so that you have five for the top section, ten for the middle section and five for the bottom section. Think about how each of the pieces will look once they are all put together. Try not to have two pieces the same colour next to each other, and think about which way up they will need to face.

Upcycled Christmas Card Baubles as Hanging Decorations

Starting with the bottom section, glue two pieces together, matching the edges up neatly. Then glue three more pieces on so that they form a circle. You can use mini pegs here to help hold the pieces together if you need to.

Upcycled Christmas Card Baubles as Hanging Decorations

Upcycled Christmas Card Baubles as Hanging Decorations

Do the same with the top section, but be sure to leave one edge open.

Take a length of thread, string, ribbon or wool (I used the string from a Chrsitmas tree chocolate) and knot the ends together. Slide the knot between the two open edges of the top section and glue the edges together. Pull the thread tight and apply a little glue to the inside to keep it securely in place.

Upcycled Christmas Card Baubles as Hanging Decorations

Upcycled Christmas Card Baubles as Hanging Decorations

Upcycled Christmas Card Baubles as Hanging Decorations

For the middle section, glue the ten pieces together to form a long line, then join the ends together to form a collar.

Upcycled Christmas Card Baubles as Hanging Decorations

Upcycled Christmas Card Baubles as Hanging Decorations

Glue the bottom section on, taking care to match up all of the edges (use pegs if you need to). Repeat with the top section and leave to dry.

And here it is! A super cute Christmas decoration ready for next Christmas!

Upcycled Christmas Card Baubles as Hanging Decorations

I also created this little beauty using non-recyclable glittery Christmas cracker card 🙂

Upcycled Christmas Cracker Glitter Baubles as Hanging Decorations

Upcycled Christmas Cracker Glitter Baubles as Hanging Decorations

Upcycled Christmas Cracker Glitter Baubles as Hanging Decorations

Upcycled Christmas Cracker Glitter Baubles as Hanging Decorations

What will you create one out of?

DIY Upcycled Christmas Greeting Card Baubles

Happy crafting and happy upcycling!
Suzanne

3D Papercraft Projects · Christmas Papercraft · Upcycling Projects

DIY Upcycled Hanging Star Decorations

Several years ago, I sorted through my huge pile of used Christmas cards, wondering what I could possibly do with them. Most of them had glitter on them and were donated to me because they couldn’t be recycled. So I started to think about ways to upcycle them. This led to new creations, including these fabulous hanging star decorations!

DIY Upcycled Christmas Card Hanging Star Decorations

I created a template (see below), which is about 7.5cm / 2.95″ high, and cut out as many as I could from the cards. Then I sorted them into groups of 5 and arranged them in the order that I wanted them to be. As they are double-sided, you will need 10 of this shape to complete one star decoration:

Upcycled Christmas Card Star Template

To make one, you will need:

  • used Christmas cards, greeting cards or card packaging
  • star template (see above)
  • pencil or pen
  • scissors or craft knife
  • ruler
  • scoring tool
  • strong, all purpose glue or double-sided tape
  • ribbon, string or thread

Here’s my video tutorial showing how to make the stars:

They really are a fabulous way of using up old Christmas cards. In fact, any type of greeting cards or card packaging can be reused to make these stars. They’re not just for Christmas!

DIY Upcycled Christmas Card Hanging Star Decoration

DIY Upcycled Christmas Card Hanging Star Decoration

I still seem to have quite a large pile of used Christmas cards, so I will have a think as to what else I could make out of them!

Pile of used Christmas Cards

Happy crafting and happy upcycling!
Suzanne 🌟

3D Papercraft Projects · Gift Bags · Upcycling Projects

Even More Upcycled Favour Bags!

Once again, I have been busy making more upcycled favour bags using my Butterfly Favour Bag template.

Four upcycled favour bags by Esselle Crafts

For this first one, I cut the front, back and side panels out of an old tissue box, then used a silver metallic marker pen around the edges before gluing them in place. To compliment the silver, I used silver glitter card for the handle panels.

White upcycled favour bag with leaf design

The panels on this colouful butterfly bag started life as a different kind of gift bag! It was given to me last year, but the base was slightly damaged, so I cut it up and used as much of it as I could.

Pink upcycled favour bag with gold butterfly design

The front and back panels came from the front and back of the original gift bag, and the smaller side panels came from the sides of the bag, which were a lovely dark, gold colour. To compliment this, I used a gold metallic marker pen around the edges of the panels and a bright gold glitter card for the handle panels.

Three pink upcycled favour bags with gold butterfly design

The original gift bag was quite large, so I ended up making three bags – one large and two small!

Three pink upcycled favour bags with gold butterfly design

This next bag is definitely my favourite! 💛 The giraffe design came from another old tissue box, and again I used a gold metallic marker pen around the edges of the panels. I cut the side panels and handle panels out of gold mirror card and had just enough of the giraffe design card to make a matching gift tag!

Yellow upcycled favour bag with giraffe design

Yellow upcycled favour bag with giraffe design

This next bag also started life as a different kind of gift bag and, just like the other one, I cut the front and back panels from the front and back of the original gift bag and the smaller side panels from the sides of the bag.

White upcycled favour bag with pastel heart design

The gift bag was quite large again, so I had enough to make three small bags!

Three white upcycled favour bags with pastel heart design

Finally, I had collected two tropical jungle design tissue boxes, which I turned into these two fabulous favour bags! I used green glitter card for the handle panels, and the main bag pieces were cut from the cover of an old art folder. 

Two black upcycled favour bags with green tropical jungle design

As I wrote in my previous post, not all of the bags are made entirely from upcycled materials, but it gave me a good chance to go through my cardstock scraps and use bits that have been hanging around for a long time ♻️

How to make upcycled favour bags blog post by Esselle Crafts

Happy crafting and happy upcycling! ♻️
Suzanne

3D Papercraft Projects · Cricut Design Space · Gift Bags

Mini Gold Favour Bags

Using my butterfly favour bag template, I experimented with different sizes and created these cute mini black and gold bags!

Set of Four Mini Gold Paper Craft Favour Bags

I used gold mirror card for the panels and, instead of using the butterfly, I embossed each of the panels with small polka dots. I kept the bows as an extra embellishment, despite the fact that they were so ridiculously tiny to make!

Set of Four Mini Black Paper Craft Bows

I reduced the size of the SVG template in Cricut Design Space to 17.5cm / 6.9″ (W ) making the measurements of the finished bags approximately 5.7cm (W ) x 2.3cm (D) x 7.4cm (H) / 2.25″ (W ) x / 0.9″ (D) x / 2.9″ (H).

This made them the perfect size to hold a mini Lindt chocolate teddy bear!

Set of Four Mini Gold Paper Craft Favour Bags with Chocolate Lindt Teddy

Here you can see the difference in size compared to the standard size bag that I made. 

Mini Gold Paper Craft Favour Bag and Butterfly Favour Bag

I think you’ll agree that these mini versions are super cute, but also super stylish. What little treats would you put inside a bag this small?

Mini Gold Favour Bags Blog by Esselle Crafts

Happy crafting
Suzanne

3D Papercraft Projects · Gift Bags · Upcycling Projects

More Upcycled Favour Bags!

Following on from my previous post, I have been busy making more upcycled gift bags using my Butterfly Favour Bag template.

Colourful Upcycled Favour Bags by Esselle Crafts

The main structure of this stunning purple bag is made from an old school book cover! I then cut the front, back and side panels out of textured paper. The handle panels were cut from silver mirror card and the enlarged bow was made from another piece of the school book cover.

I think this is definitely one of my favourites! 💜

Purple Upcycled Favour Bag by Esselle Crafts

This red bag, along with its bow, also started life as a school book cover! I then cut all of the panels out of red mirror card and embossed them with a beautiful leaf design.

Red Upcycled Favour Bag by Esselle Crafts

I cut the decorative panels on this black leopard print bag out of an old paper bag – you know, the ones you get from little gift shops. I first had to back the paper bag onto thin white card to give it some stability before cutting the panels out. I then ran a gold metallic marker pen around the edges, which perfectly compliments the gold mirror card handle panels.

Leopard Print Upcycled Favour Bag by Esselle Crafts

Here’s all three of them together, looking absolutely gorgeous!

Three Colourful Upcycled Favour Bags by Esselle Crafts

I created these two white bags from old textured cardstock that I’d taken from another project. Don’t they look amazing?! I love the look of white on white. There were a few imperfections on some of the panel pieces, so I embossed each of them using a knitted pattern design, which made them perfect! I then used the leftover scraps to make the little bow and the layered flower.

Two White Upcycled Favour Bags by Esselle Crafts

For this last bag, I cut the main black pieces out of an old art folder and the panels out of a tissue box. I cut the panels out by hand as I wanted to line the little dogs up so that the pattern was equal on both sides. I then ran a silver metallic marker pen around the edges and cut the handle panels out of silver glitter card to match. 

Upcycled Sausage Dog Favour Bag by Esselle Crafts

Whilst not all of the bags are made entirely from upcycled materials, it was a good chance to use up some of my cardstock scraps and experiment with different textures. 

How to make upcycled favour bags blog post by Esselle Crafts

So, which bag is your favourite now?

Colourful Upcycled Favour Bags by Esselle Crafts

Happy crafting and happy upcycling! ♻️

Suzanne

3D Papercraft Projects · Gift Bags · Upcycling Projects

Upcycled Favour Bags

I’ve recently been experimenting with my butterfly favour bag template, seeing what other versions I could come up with, and just look at what I’ve created!

Seven Upcycled Favour Bags by Esselle Crafts

Aren’t they fabulous!?

Most of the bags are decorated with small paper scraps, and I upcycled old greeting cards, Christmas crackers and card packaging for the others ♻️

My favourite has to be the Guinea pig bag, made using a square tissue box.

I started by making the bag out of Kraft card, then I cut the front and back panels from the front and back of the tissue box and the two side panels from the picture on the base of the box. I drew around the edges of the panels with a gold metallic marker pen before gluing them on, then cut the handle panels from scraps of gold mirror card.

Guinea Pig Upcycled Favour Bag by Esselle Crafts

For this rainbow bag, I reduced the size of the template slightly and cut the main bag pieces out of an old school book cover. I then cut the front and back panels out of white copy paper. I found lots of different coloured cardstock scraps and cut them into thin strips. Then I glued the red strip down the centre of the front and back panels and filled the rest with the other colours. After trimming any ends off, I drew around the edges with a gold metallic marker pen, then cut the two side panels and the handle panels out of gold mirror card.

Upcycled Rainbow Favour Bag by Esselle Crafts

For this next one, I made the main bag out of red cardstock, then cut a front and back panel out of white copy paper. I die cut small hexagons from old Christmas crackers (that I had saved from a couple of years ago) and glued them onto the panels to make a patchwork effect. I then cut the two side panels out of a larger piece of glittery, silver cracker and cut the handle panels out of silver mirror card.

Upcycled Red Patchwork Favour Bag by Esselle Crafts

The pink card that I used for this next bag was an old A4 folder divider that I no longer needed. Again, I cut the front and back panels and two side panels from copy paper, then found lots of small scraps of cardstock, greeting cards and food packaging and punched out as many squares as I could using my 1.1cm square punch.

Call me obsessive, but I really wanted all of the edges to match up so that it looked like a candy wrapper bag, and here’s how the panels looked once I’d finished.

Pieces for an Upcycled Favour Bag by Esselle Crafts

Before gluing them on, I ran the panels through my Big Shot to flatten them and it gave them a nice smooth finish.

Colourful Patchwork Upcycled Favour Bag by Esselle Crafts
Colourful Upcycled Favour Bags by Esselle Crafts

I made this next one in a similar way, using scraps of gold mirror card. Running these panels through my Big Shot created almost a matt finish, and I drew around the edges with a gold metallic marker pen afterwards to hide the white core.

Black and Gold Upcycled Favour Bag by Esselle Crafts

It’s very similar to these mini gold handbags that I made using the same template.

Black and Gold Upcycled Favour Bags by Esselle Crafts

I’m completely obsessed with making these bags now, and will definitely be making more!

Upcycled Favour Bags by Esselle Crafts

Watch this space!

Suzanne