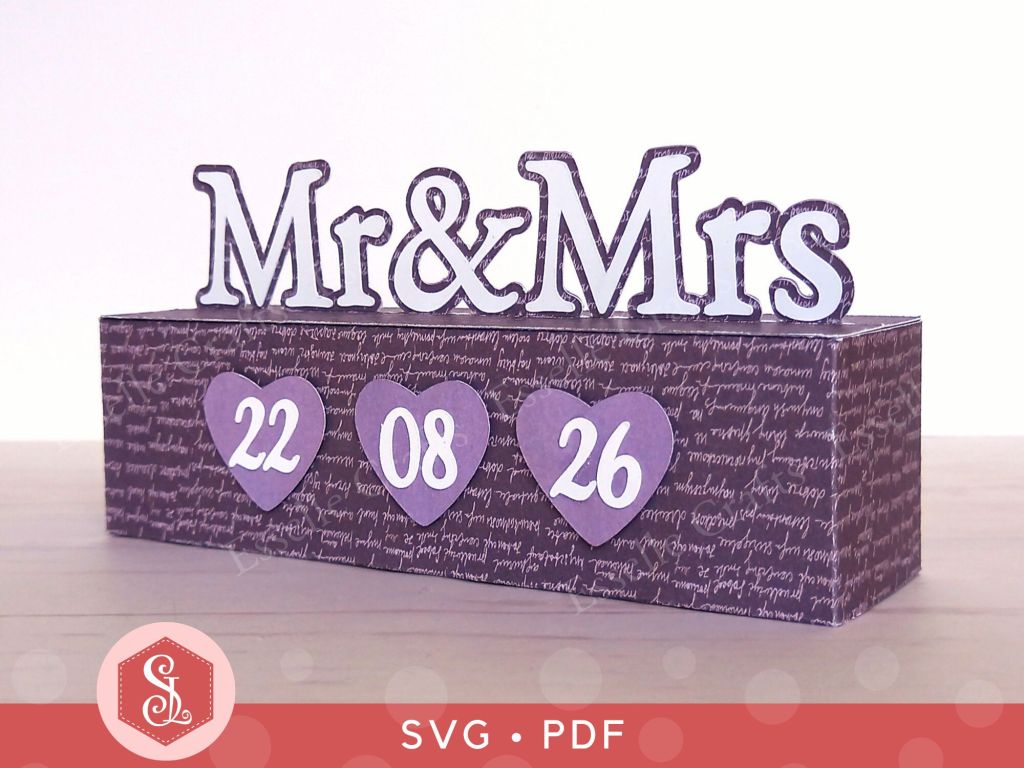
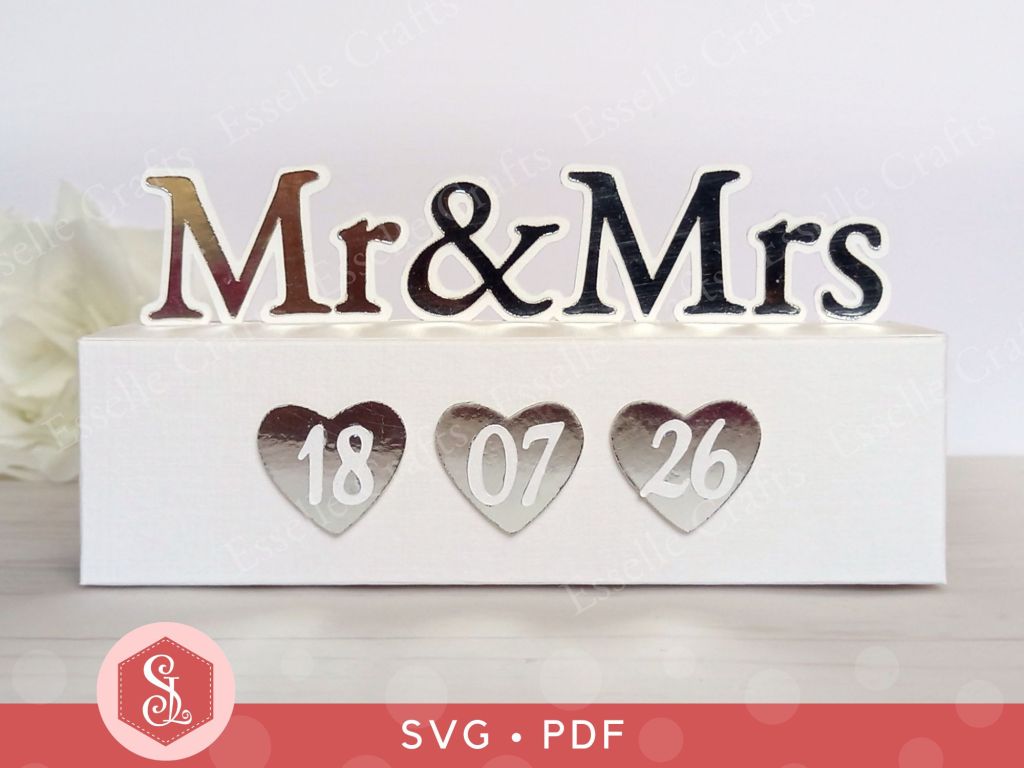
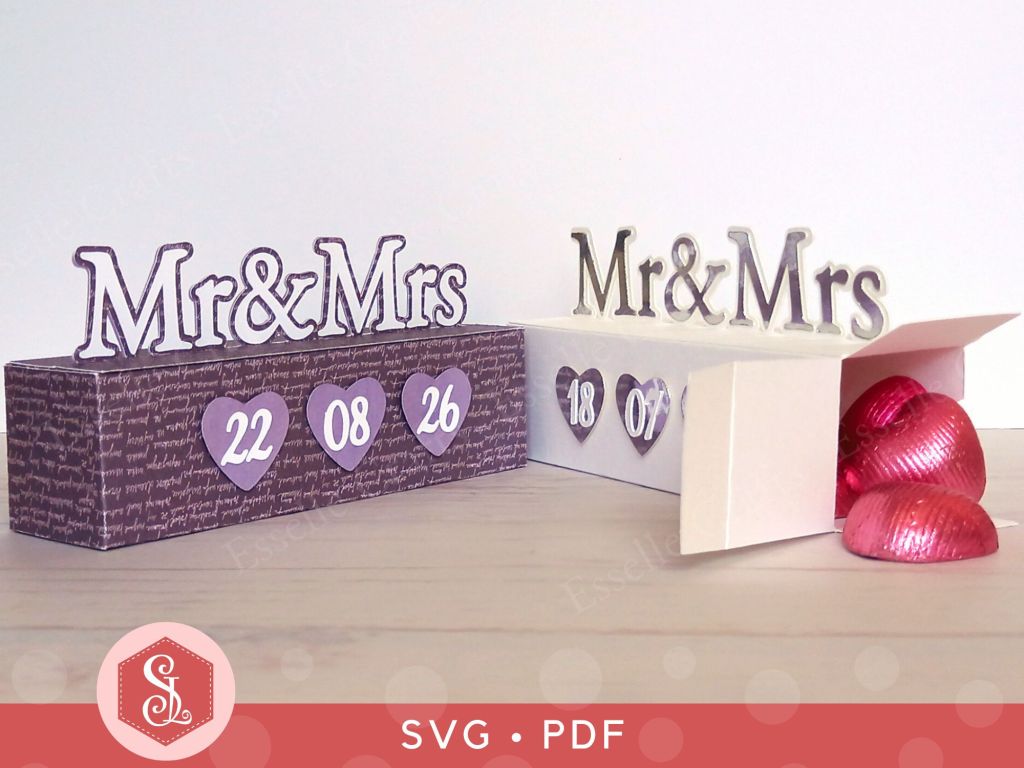
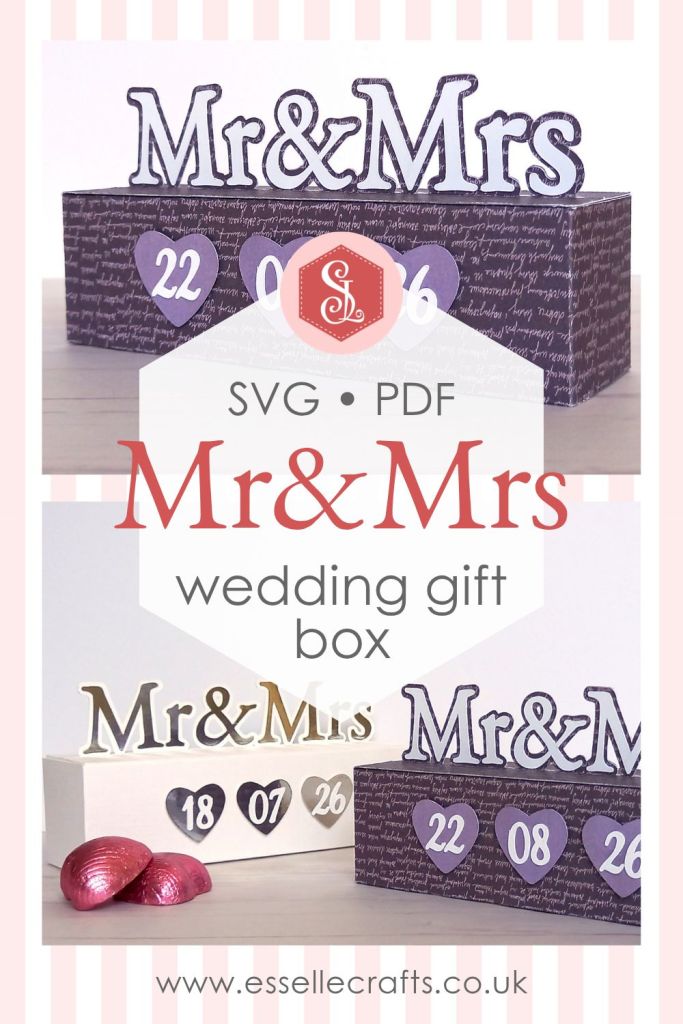
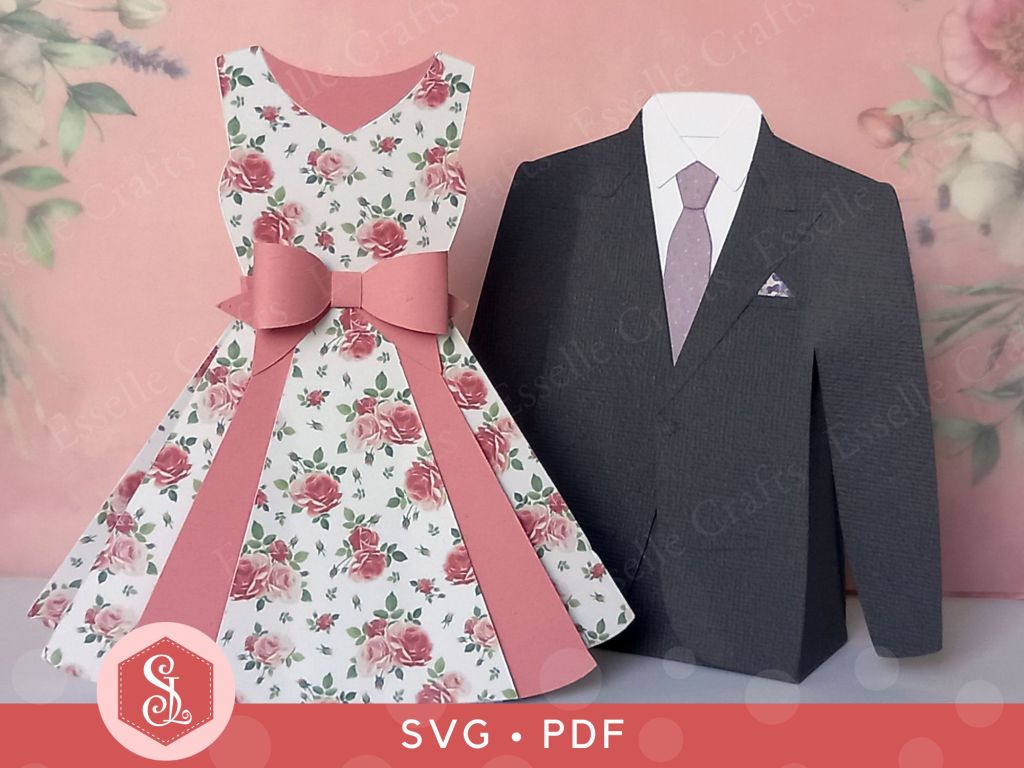
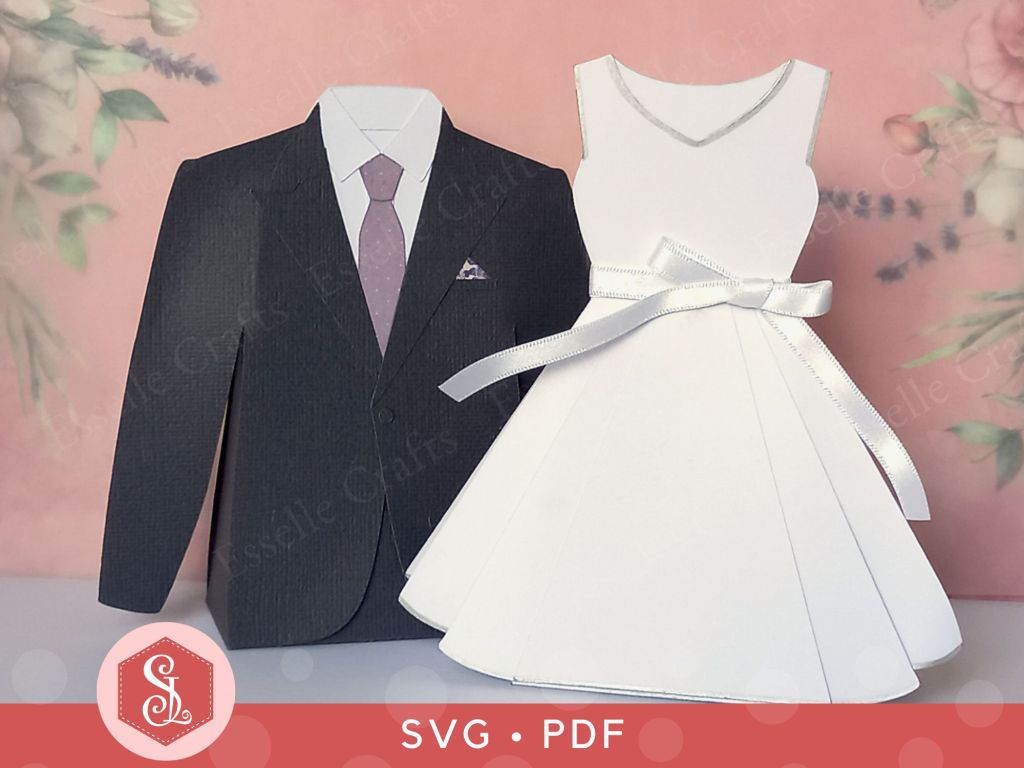
This impressive Mr & Mrs treat box is the perfect way to add a little handmade happiness to your wedding gift giving.
Designed with simplicity and creativity in mind, it can be filled with chocolate hearts, sweets, small gifts or thoughtful surprises for the bride and groom, and can even be personalised with the date of the wedding!
The templates for this heartfelt box come as SVG cut files, as well as printable PDFs if you prefer to cut out by hand.
To make one, you will need:
* Mr & Mrs Treat Box template (available as SVG cut files and printable PDFs) * Computer and printer to print the PDF templates and instructions * Digital cutting machine * Double-sided cardstock (220-250gsm / 80-92lb recommended) * Craft glue / double-sided tape
Watch my video tutorial showing how to assemble the treat box, and be sure to follow the tips below:
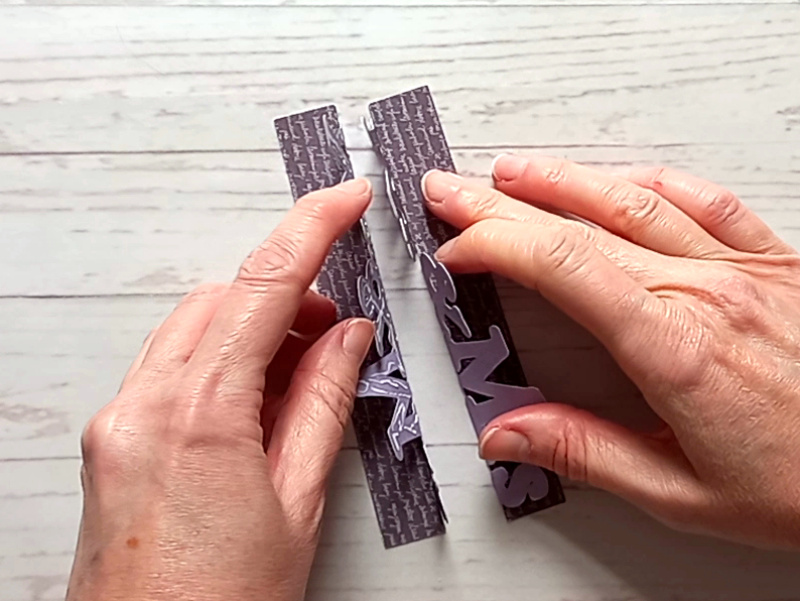
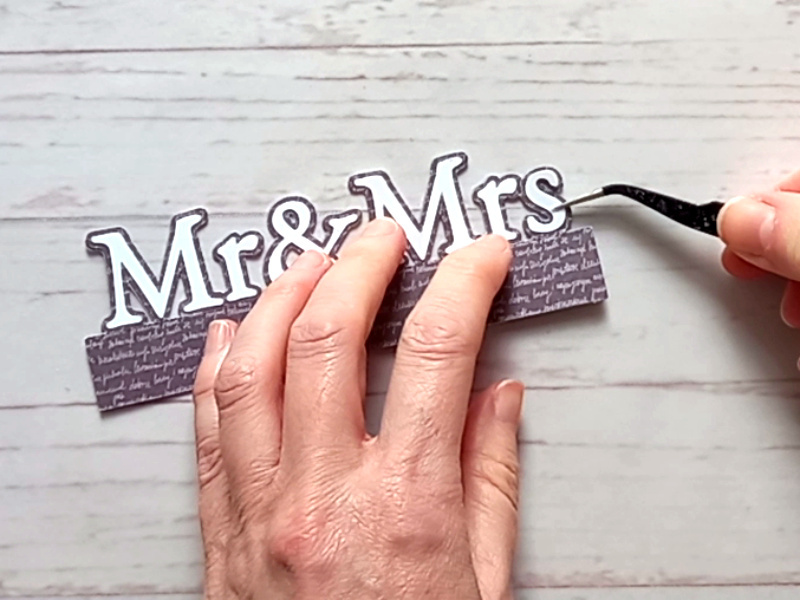
TIP 1 : After gluing the backs of the letters, slide the two top pieces together, so that the words Mr & Mrs line up perfectly.
TIP 2 : Glue the individual letters on before gluing the finished top piece to the top of the box, so that you can lay it flat.
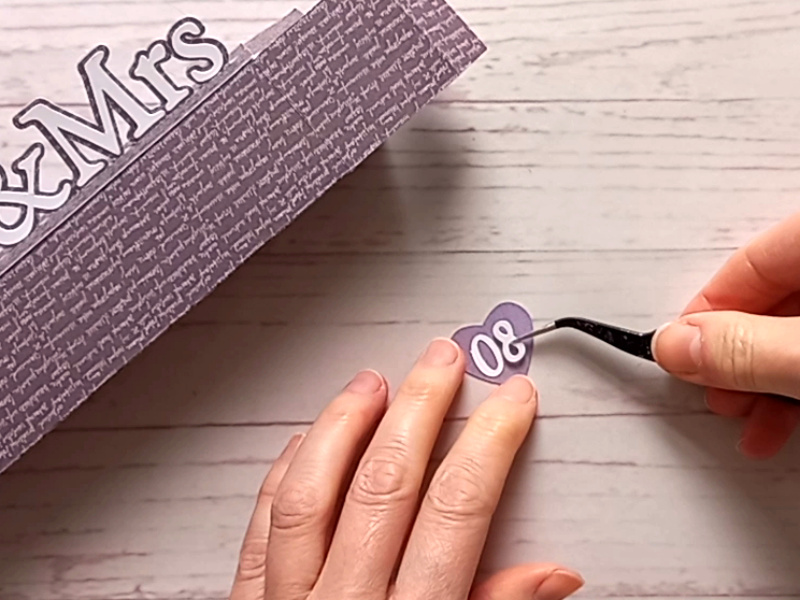
TIP 3 : Personalise the box with the date of the wedding using the three little hearts and the numbers supplied. Alternatively, you could keep the hearts plain, or stamp initials / numbers onto them.
Whether you’re crafting for family or friends, this little treat box comes together quickly and easily – perfect for wedding favours or an anniversary keepsake!
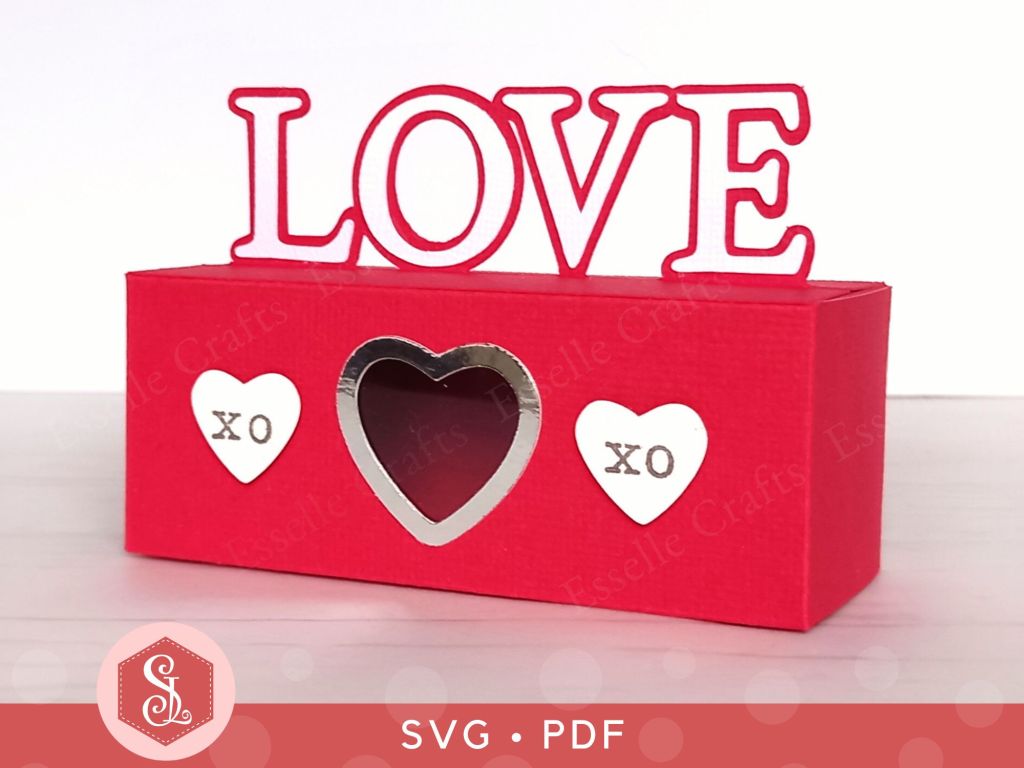
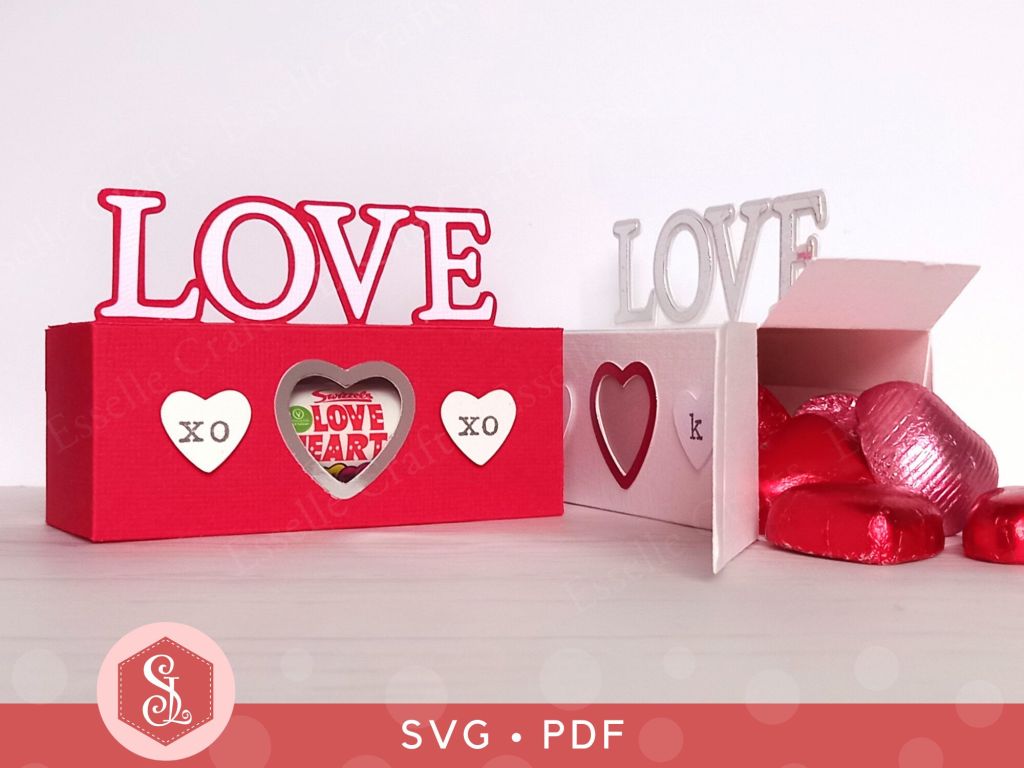
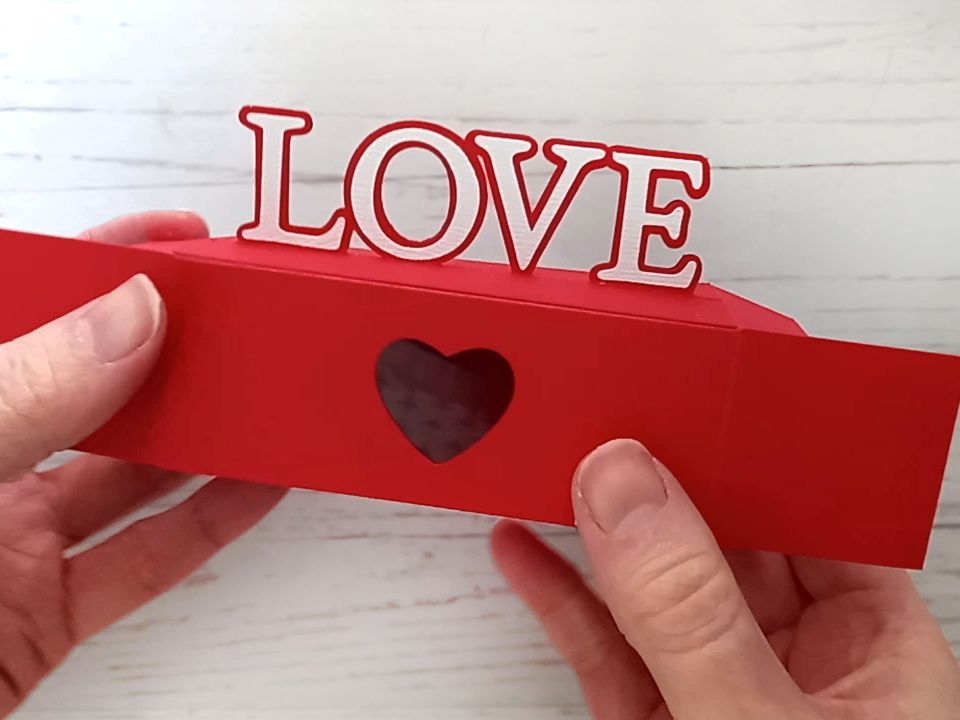
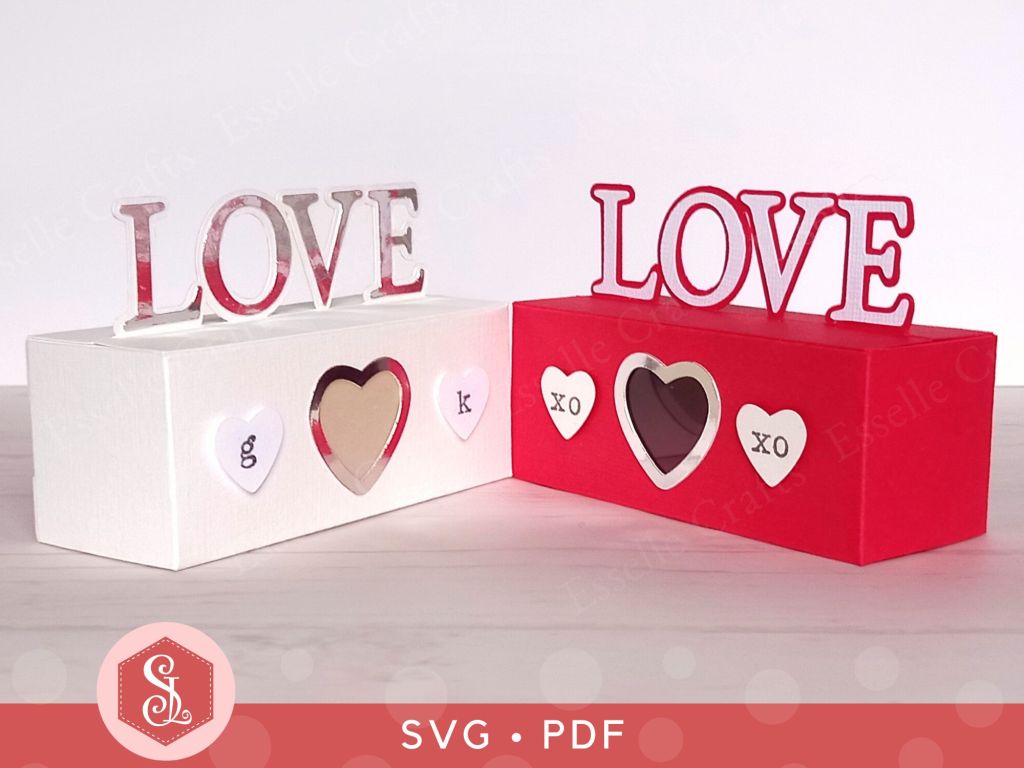
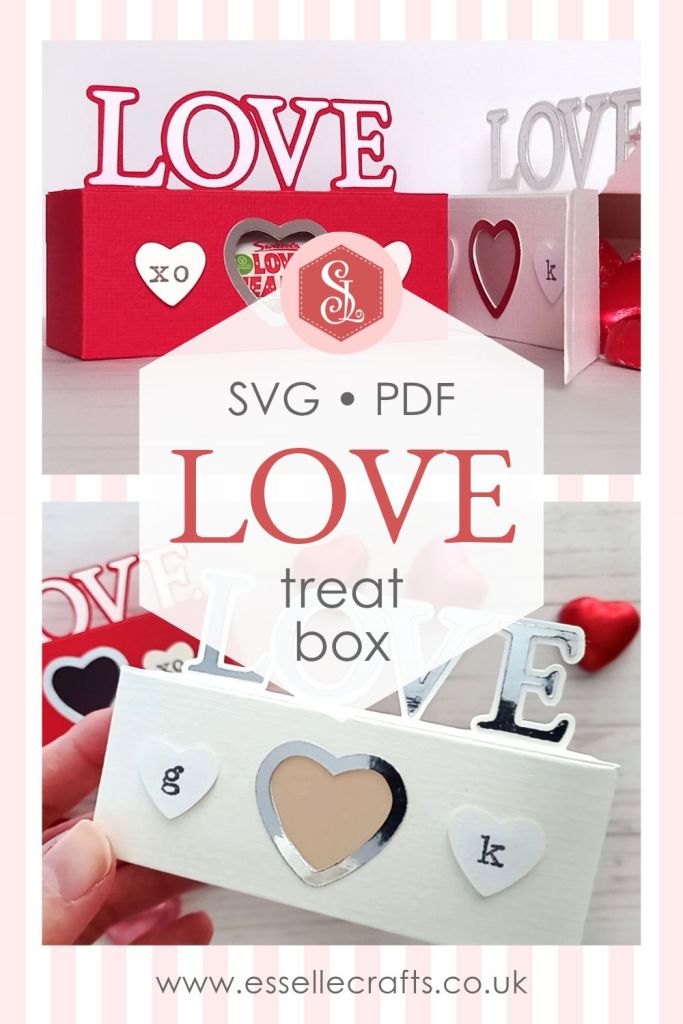
This impressive LOVE treat box is the perfect way to add a little handmade happiness to your gift giving.
Designed with simplicity and creativity in mind, it can be filled with chocolate hearts, sweets, small gifts or thoughtful surprises for the people you love most ❤️
The templates for this heartfelt box come as SVG cut files, as well as printable PDFs if you prefer to cut out by hand.
To make one, you will need:
* LOVE Treat Box template (available as SVG cut files and printable PDFs) * Computer and printer to print the PDF templates and instructions * Digital cutting machine * Double-sided cardstock (220-250gsm / 80-92lb recommended) * Acetate or vellum for the window * Craft glue / double-sided tape
Watch my video tutorial showing how to assemble treat box, and be sure to follow the tips below:
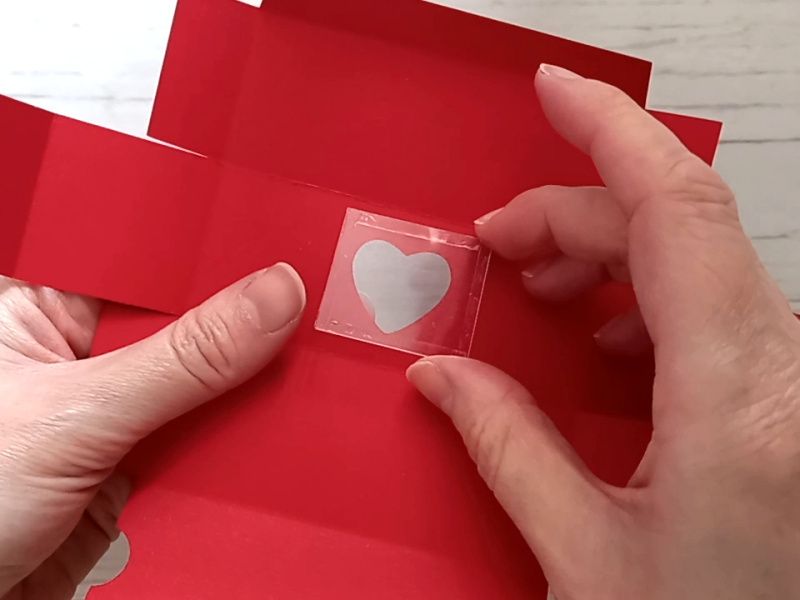
TIP 1 : If you are using acetate for the window piece, use double-sided tape or red-liner tape to attach it securely to the inside of the box.
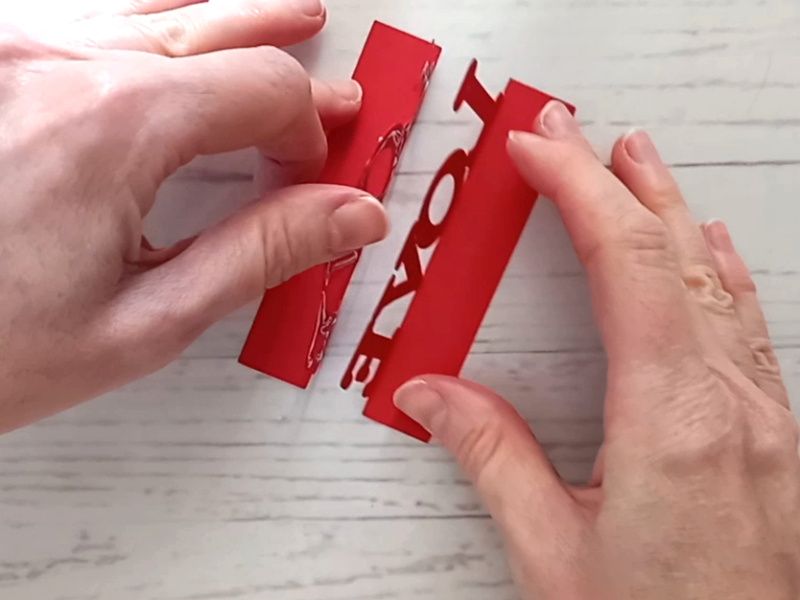
TIP 2 : After gluing the backs of the letters, slide the two top pieces together, so that the word LOVE lines up perfectly.
TIP 3 : Glue the individual letters on before gluing the finished top piece to the top of the box.
TIP 4 : You have the option to decorate the front of your box with two little paper hearts, either keeping them plain or stamping initials onto them. You could also stamp XO, or simply leave the box with just the central heart border in place.
Whether you’re crafting for family or friends, this little treat box comes together quickly and easily – perfect for Valentine’s Day or wedding favours! ❤️
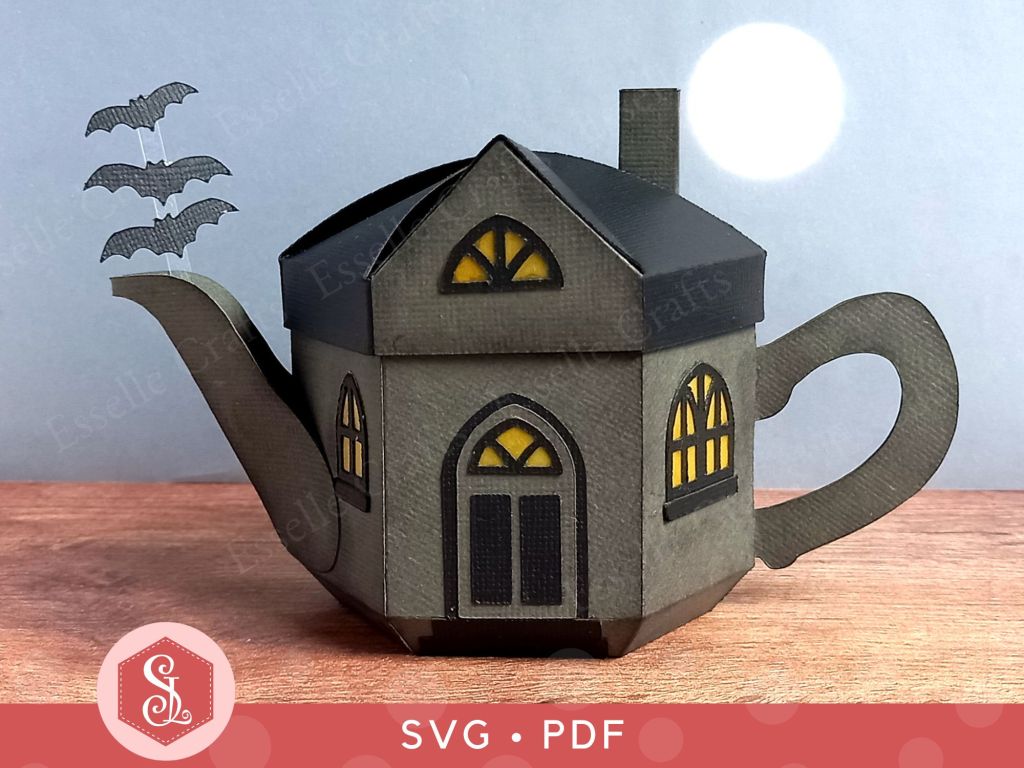
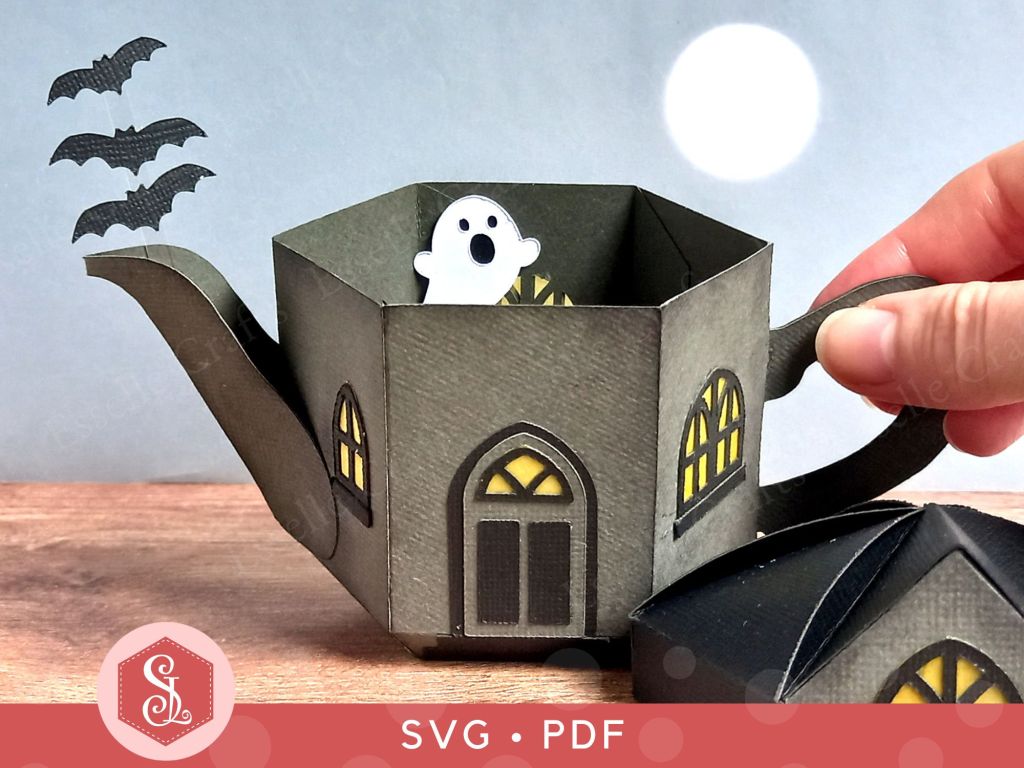
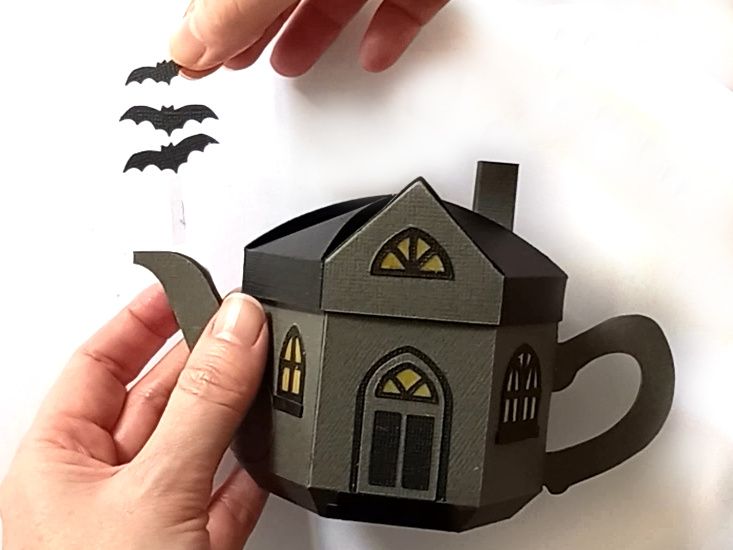
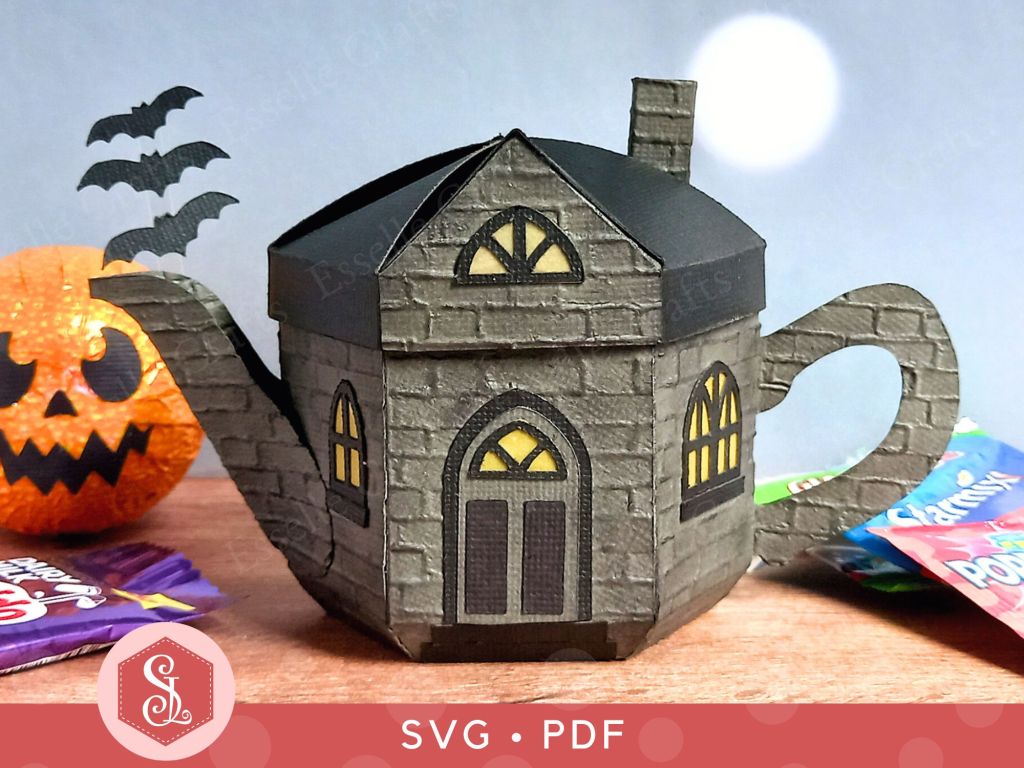
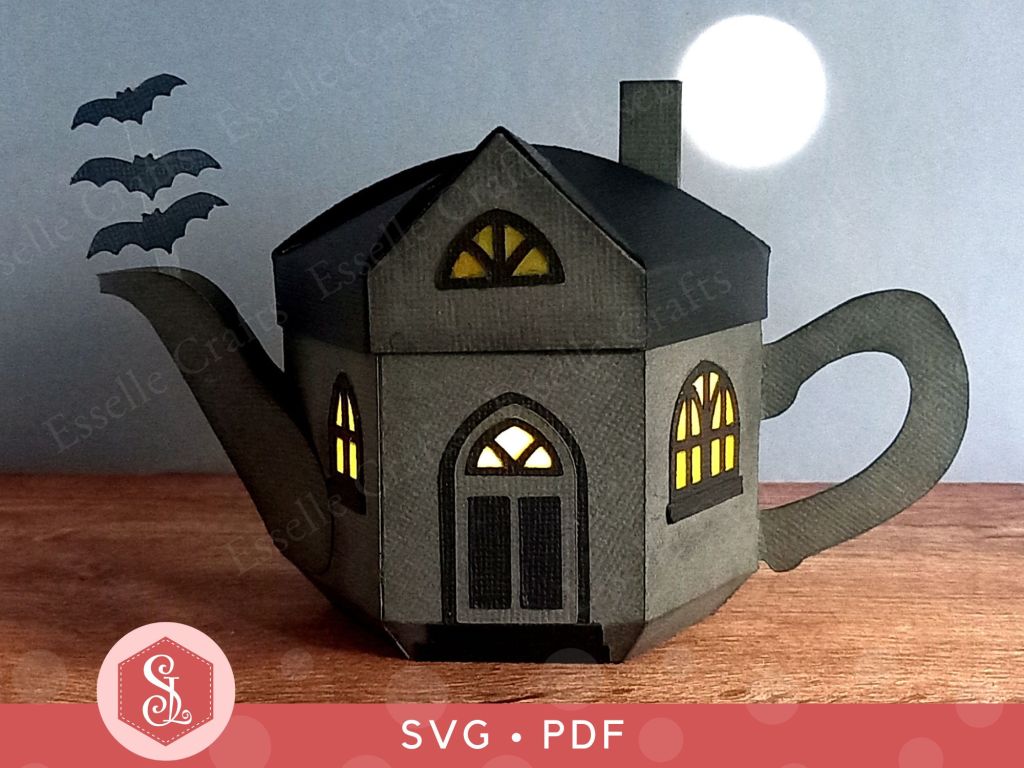
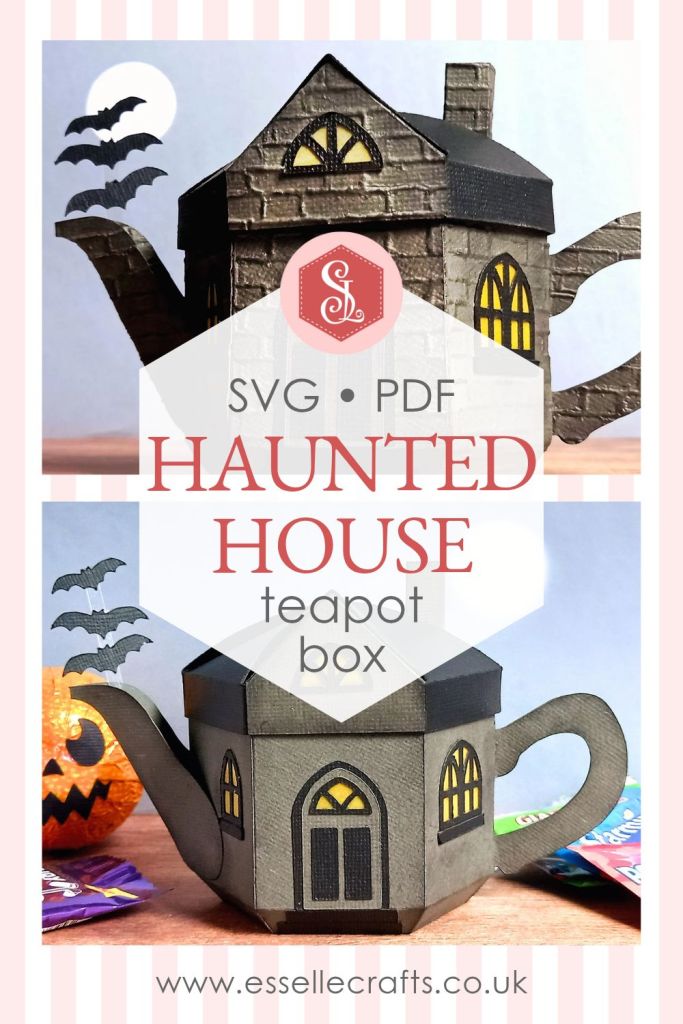
Spooky season is almost upon us! Ghosts, bats, spiders and skeletons will soon be adorning our homes, and pumpkins will be glowing menacingly at our doors and windows 🎃 So it’s only right that the next design in my house-shaped teapot box collection is this eerie-looking, gothic haunted house!
Perfect to make for Halloween parties, trick or treating or seasonal home decor, this versatile candy box can also serve as a glowing lantern centrepiece – guaranteed to surprise your guests!
The templates come as both SVG cut files and printable PDFs, making them accessible for a variety of crafting needs.
To make one, you will need:
* Haunted House Teapot Box template (SVG and PDF available) * Computer and printer to print the PDF templates and instructions * Digital cutting machine * Double-sided cardstock (220-250gsm / 80-92lb recommended) * Vellum or tracing paper * Yellow or orange permanent marker * Thin strip of acetate * Craft glue and red-liner tape
If you are not using a cutting machine you will also need: * Craft knife / scissors * Scoring tool * Ruler
Watch my video tutorial showing how to assemble the box, and be sure to follow the tips below:
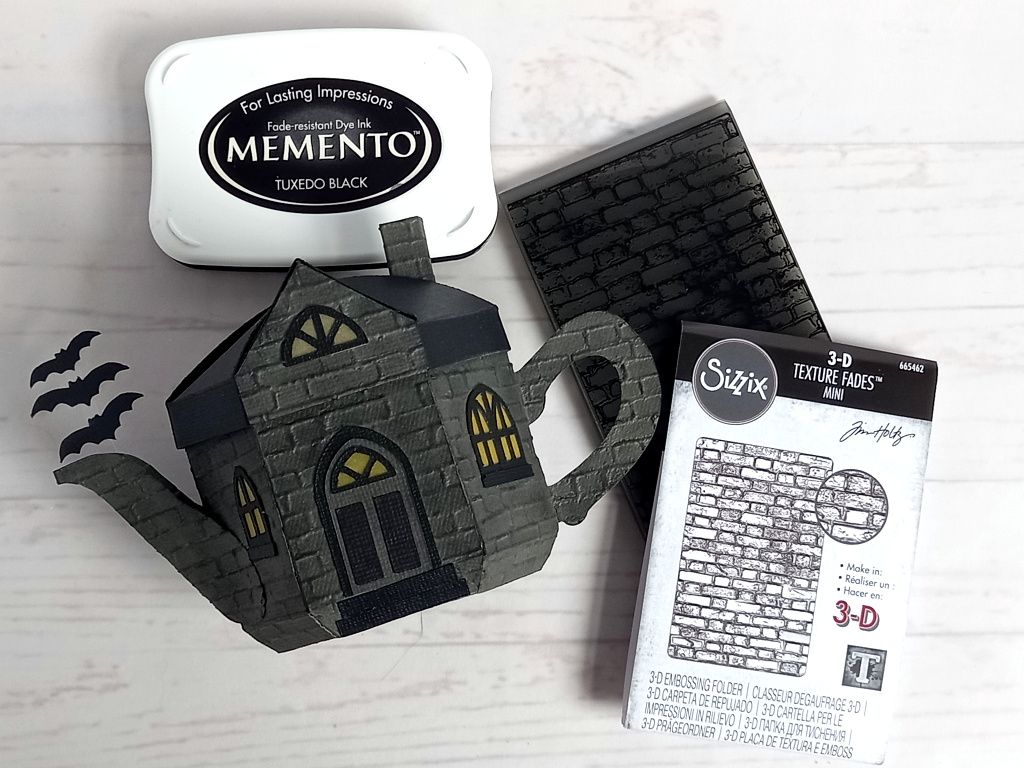
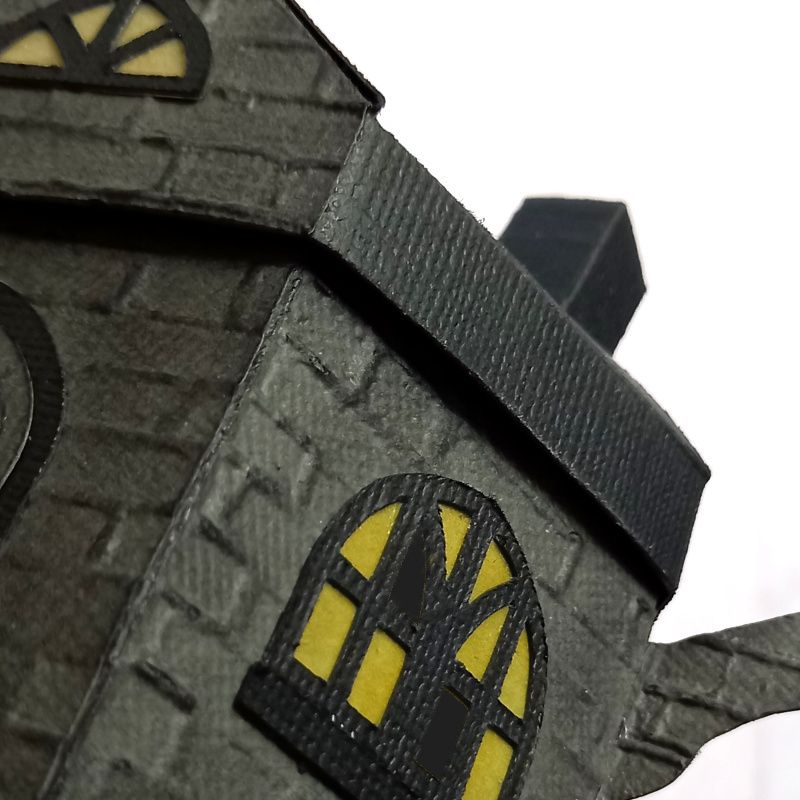
TIP 1 : If you would like to add more texture to your box, then you can try embossing the pieces before assembling. For this teapot, I used this Sizzix 3D Texture Fades Mini Brickwork embossing folder by Tim Holtz on the main body, the handle, spout, chimney and pitched roof piece. I had to do three passes on both of the main body pieces, carefully covering one side at a time. I actually debossed it instead to create more interest, then added black ink to pick out the details.
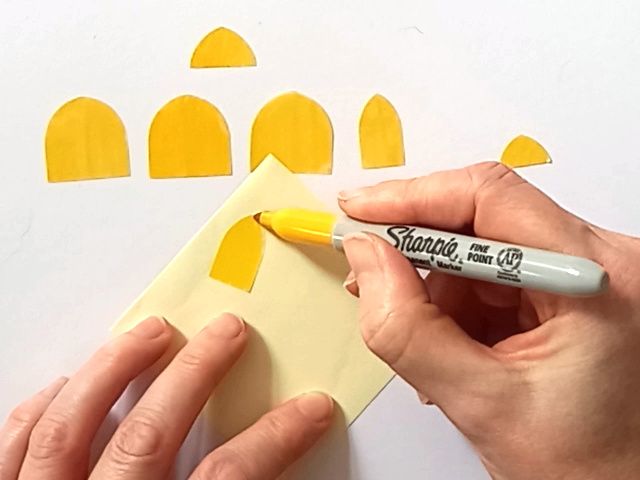
TIP 2 : Colour the vellum (or tracing paper) window pieces with a yellow or orange permanent marker. This will add to the eerie glowing effect when you place battery operated lights inside.
TIP 3 : Add a dimensional foam pad or scraps of layered cardstock to the back of the ghost and position it wherever you like on the teapot. I placed mine inside as a scary surprise! 👻
TIP 4 : The three bats can also be placed anywhere around the teapot. I attached mine to a thin strip of acetate using red-liner tape, and stuck it to the inside of the spout. It looks as though the bats are flying out of the teapot! This could work equally as well coming out of the chimney.
TIP 5 : You really don’t need to be neat when assembling this box as it’s meant to look old and abandoned. Try gluing the window sills on at a crooked angle or maybe board up a window or two.
Once assembled, your little teapot boxes are ready to be filled with candy treats. A spooky customised chocolate orange fits perfectly! 🎃 Or try putting a string of battery operated lights inside for an eerie glowing lantern!
What do you think of this new teapot box design? Will you be brave enough to make some?
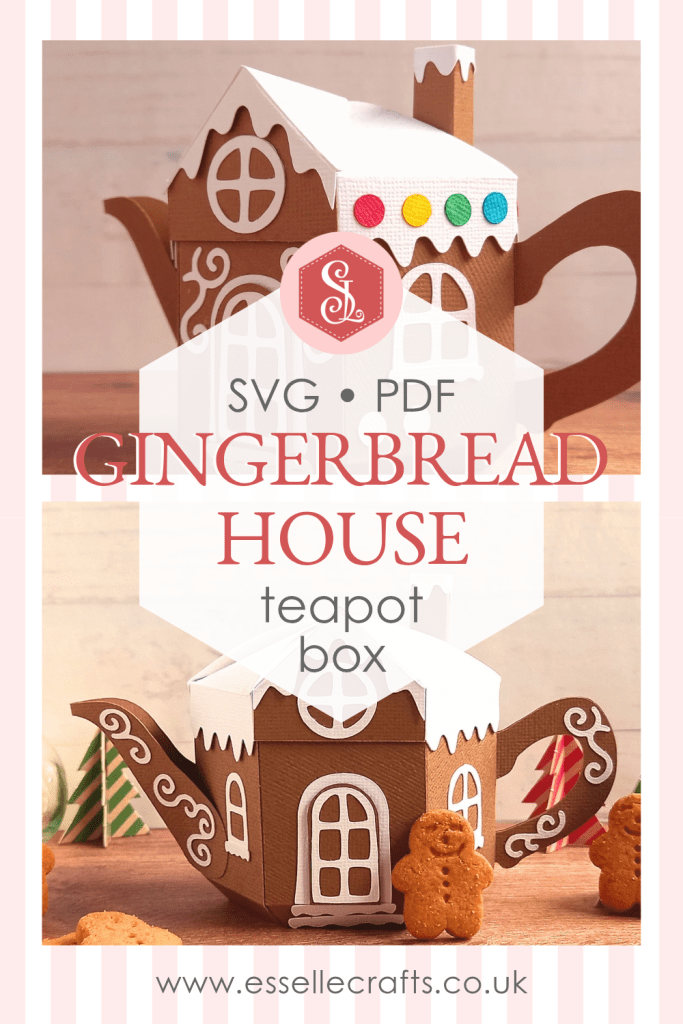
During one of the hottest weeks of the year so far, here I am thinking about Christmas!
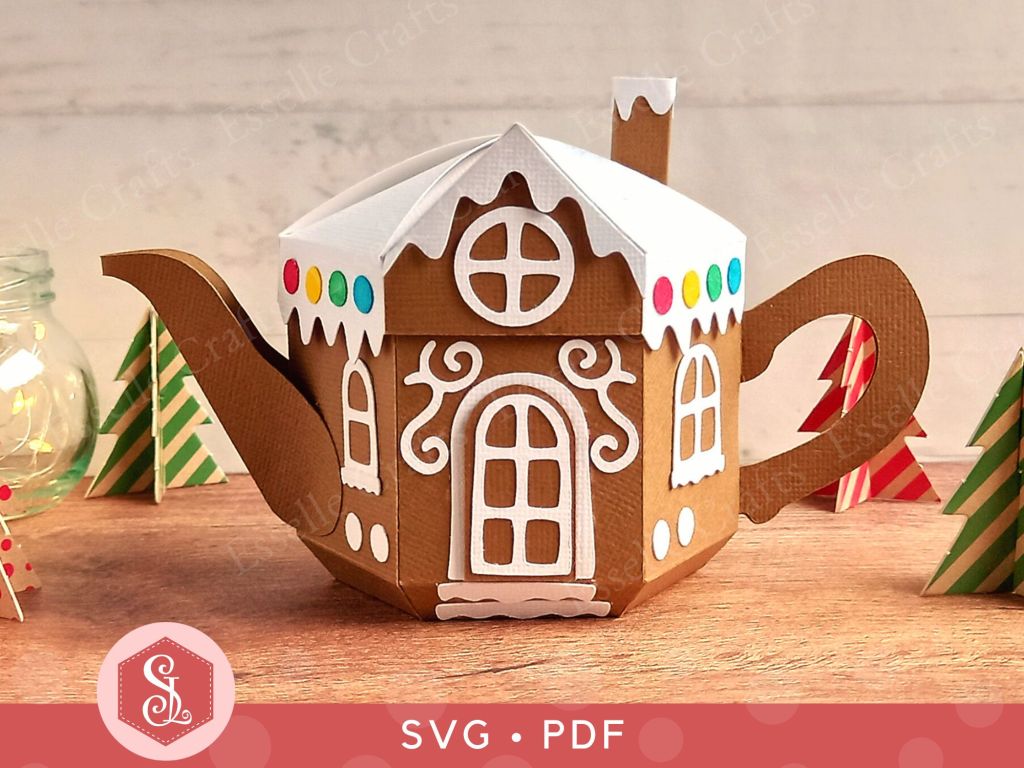
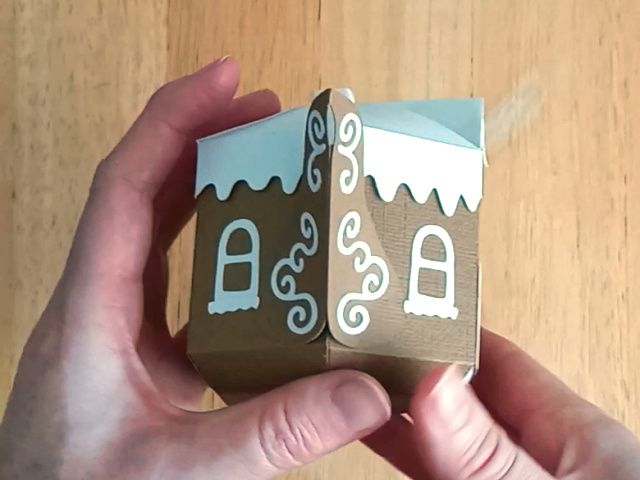
I had such lovely feedback following the launch of my Cottage Teapot Box design last month that I decided to continue with the house-shaped theme and create one in the style of a classic gingerbread house!
If you’re ready to sprinkle some early Christmas magic, then these charming little boxes are perfect to make for table favours, teacher gifts or seasonal home decor. Fill them with sweet treats or small gifts and they’re guaranteed to deliver warm memories to anyone who receives one!
The templates come as both SVG cut files and printable PDFs, making them accessible for a variety of crafting needs.
To make one, you will need:
* Gingerbread House Teapot Box template (SVG and PDF available) * Computer and printer to print the PDF templates and instructions * Digital cutting machine * Double-sided cardstock (220-250gsm / 80-92lb recommended) * Craft glue / double-sided tape
If you are not using a cutting machine you will also need: * Craft knife / scissors * Scoring tool * Ruler
Watch my video tutorial showing how to assemble the box, and be sure to follow the tips below:
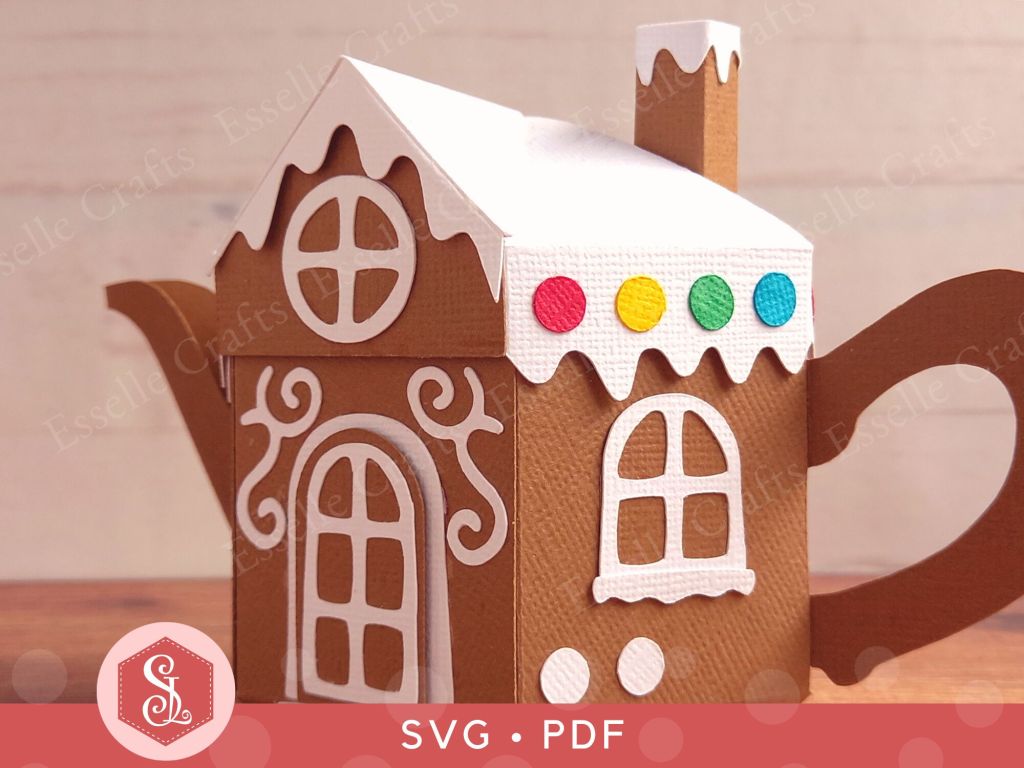
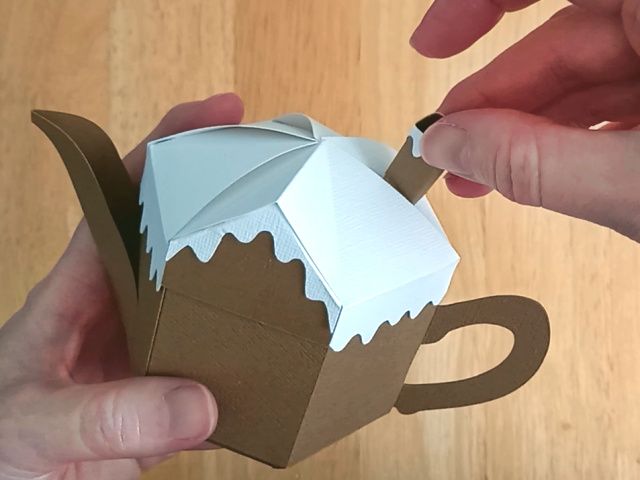
TIP 1 : Glue the white icing piece to the front pitched window piece using the two triangular tabs only. Do this before attaching it to the inside of the pitched roof.
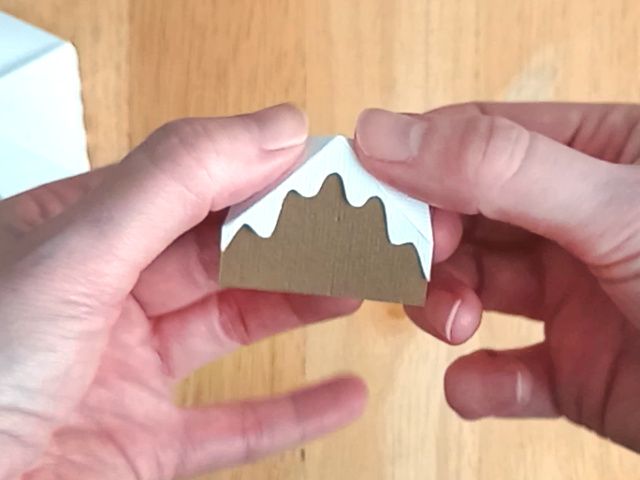
TIP 2 : Assemble the chimney before gluing the icing to the top. The chimney icing piece has no score lines, but will simply wrap around the chimney. Just remember to keep the join at the back.
TIP 3 : The decorative icing swirls can be placed anywhere around the teapot box. The designs are mirrored (flipped), so if you add them to the handle and spout, they will be the same on both sides.
Once assembled, your little teapot boxes are ready to be filled with delicious sweet treats! These packets of mini gingerbread men fit perfectly!
One teapot box will hold a surprising amount of mini gingerbread men! But they may not last long!
What do you think of this new teapot box design? Would you like to see more house-shaped designs? Let me know in the comments!
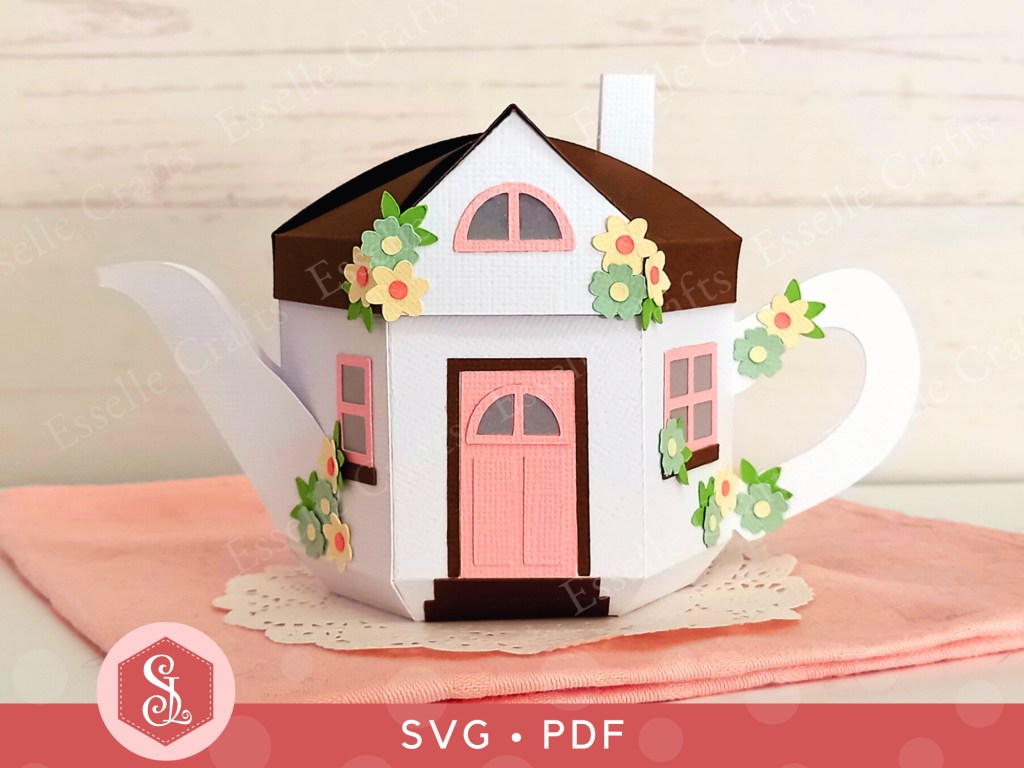
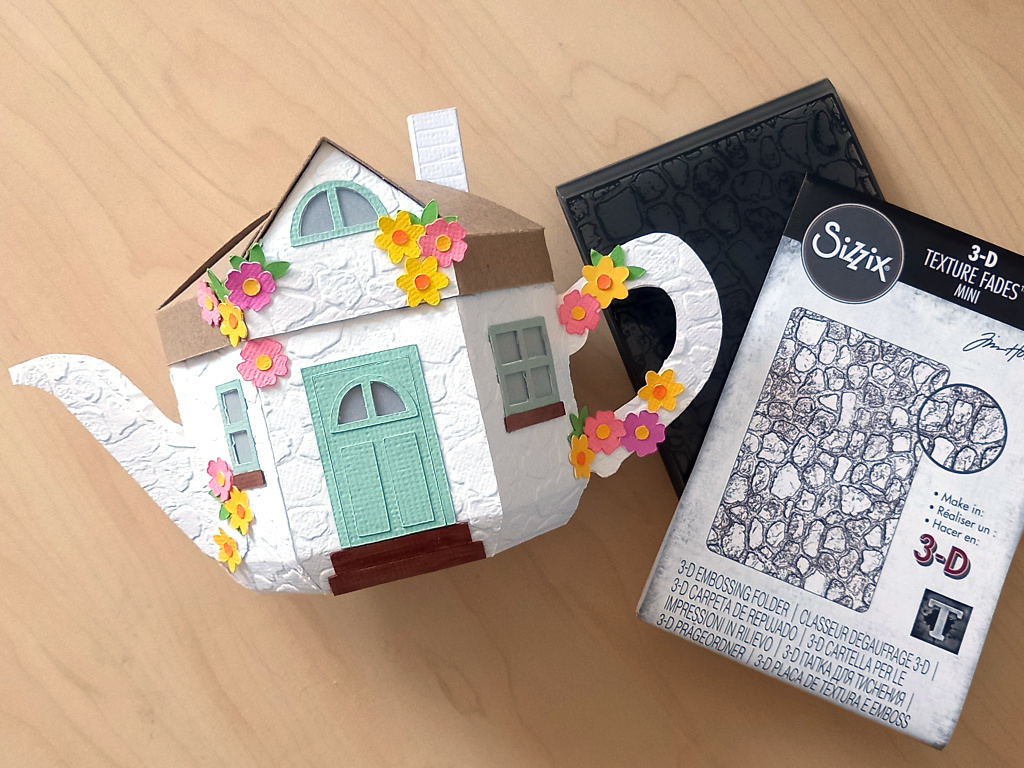
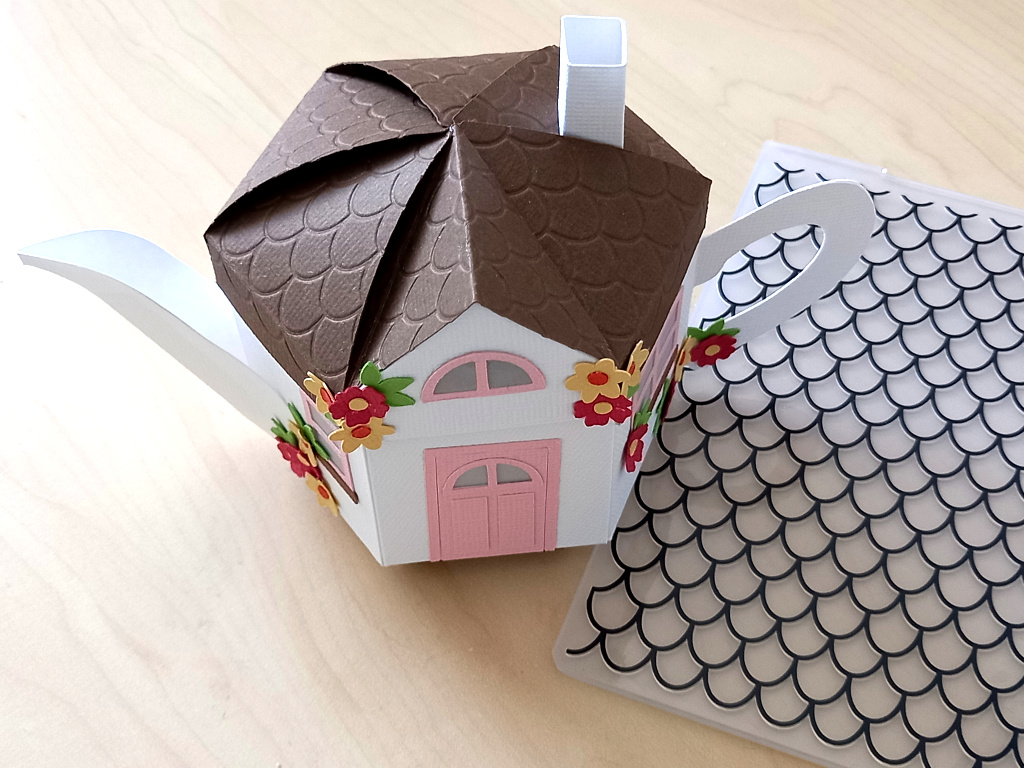
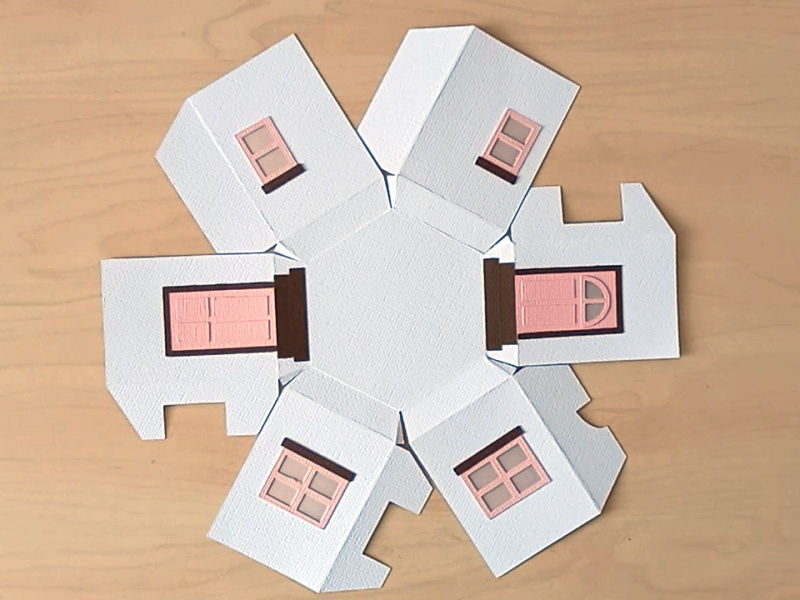
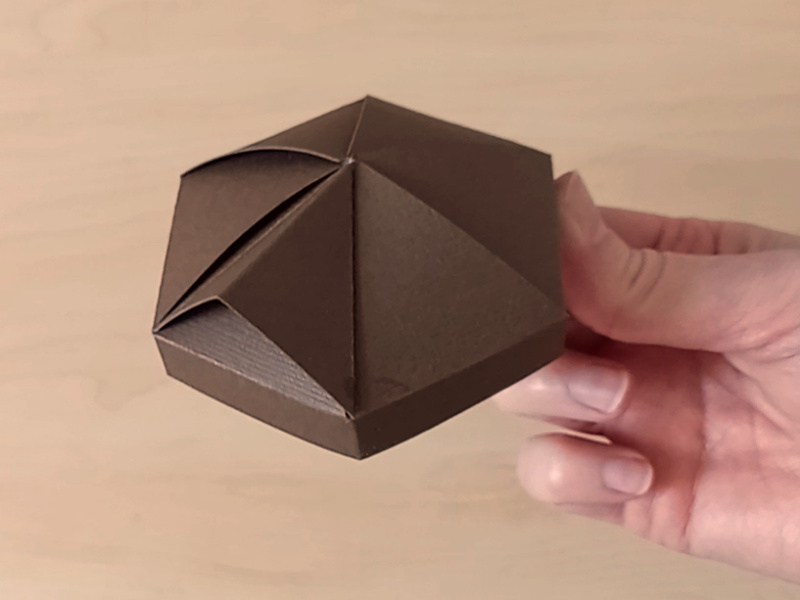
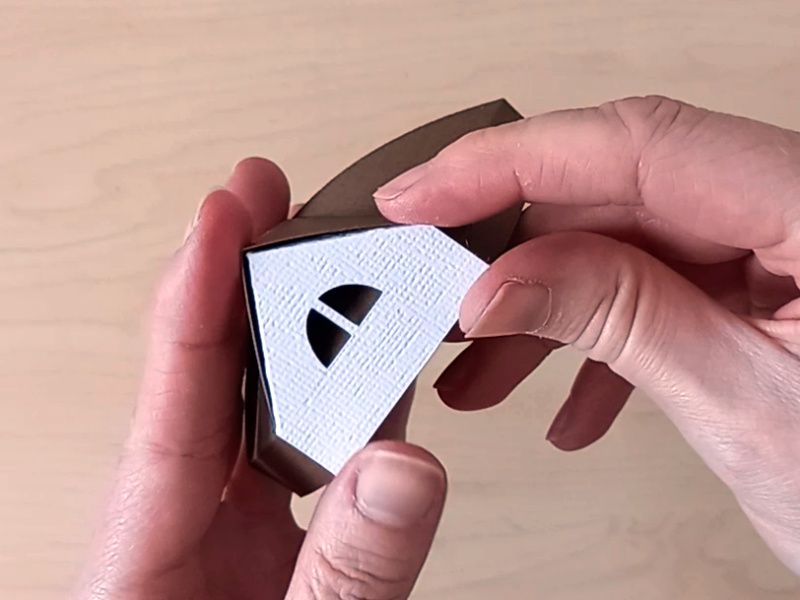
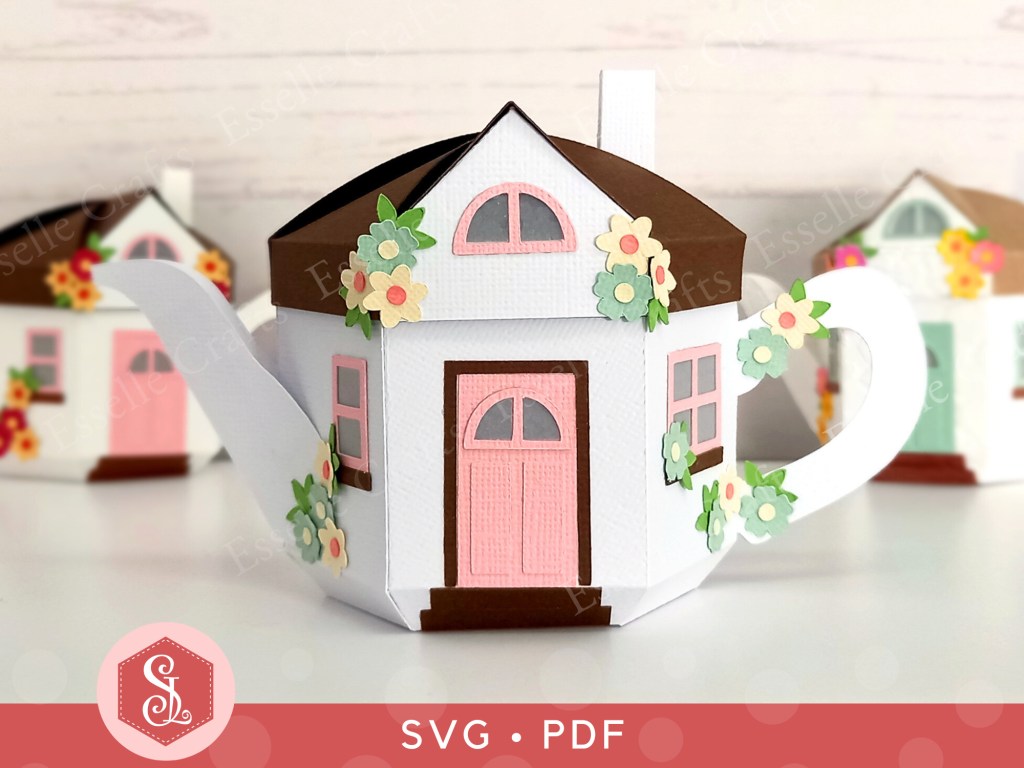
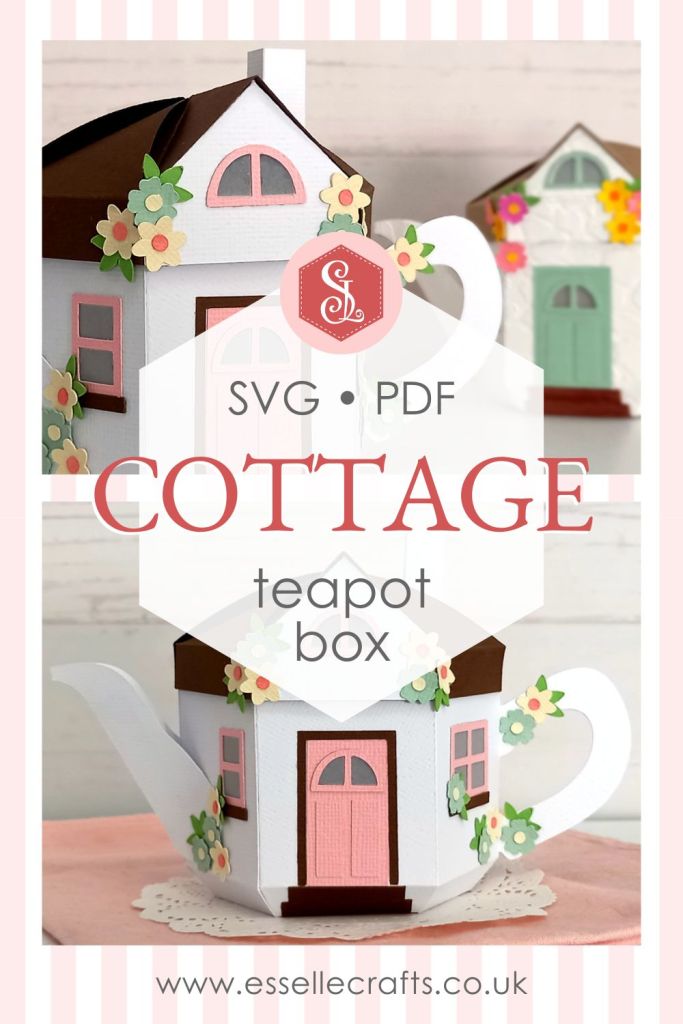
It’s time for another teapot favour box design! After having such fun designing my Teapot Dome inspired teapot box, I decided to create one in the style of a cosy, country cottage!
Perfect for birthdays, garden parties or housewarming gifts, the templates to make this box come as both SVG cut files and printable PDFs, making them accessible for a variety of crafting needs.
To make one, you will need:
* Cottage Teapot Box template (SVG and PDF available) * Computer and printer to print the PDF templates and instructions * Digital cutting machine * Double-sided cardstock (220-250gsm / 80-92lb recommended) * Craft glue / double-sided tape
If you are not using a cutting machine you will also need: * Craft knife / scissors * Scoring tool * Ruler
Watch my video tutorial showing how to assemble the box, and be sure to follow the tips below:
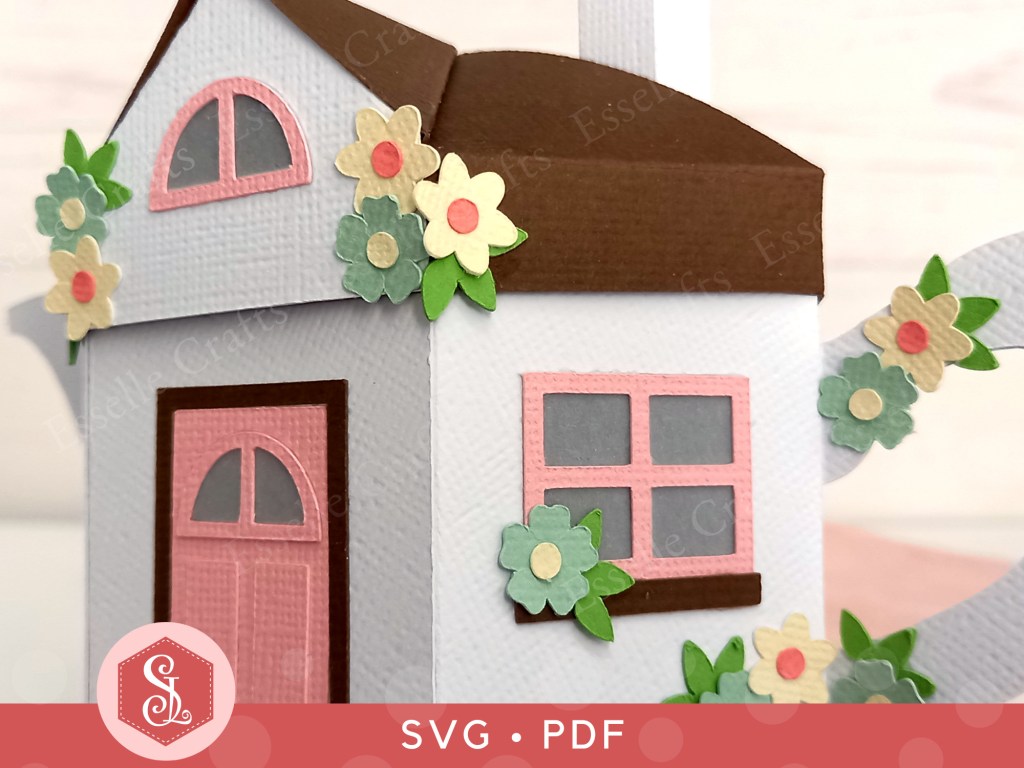
TIP 1 : If you would like to emboss the main body of the teapot, or the lid, then this should be done first before assembling. For this teapot, I used this Sizzix 3D Texture Fades Mini Cobblestone embossing folder on the main body, the handle, spout and pitched roof piece. I had to do three passes on both of the main body pieces, carefully covering one side at a time.
And for this teapot box, I used this roof tile embossing folder on the lid. Again, I had to do three passes, covering two lid flaps at a time.
TIP 2 : Glue the two doors and the four rectangular windows and window frames in place whilst the main teapot piece is still flat.
TIP 3 : For the pitched roof, push the right side tab under the front lid flap and the left side tab under the lid flap on the left. Press it down firmly to secure it in place.
TIP 4 : When attaching the (white) pitched roof window piece, apply glue to the front of the (brown) lid as well as the two tabs on the white piece. By leaving the window off at this stage, you should be able to poke a thin pair of tweezers through the window gaps to press it into place.
Once fully assembled, your cosy cottage teapot box will hold a range of small gifts or delicious treats. But that’s not all! With the addition of a string of battery operated lights inside, this versatile box can also serve as a glowing lantern centrepiece – guaranteed to impress!
What will you fill your little cottage teapot boxes with? Let me know in the comments below!
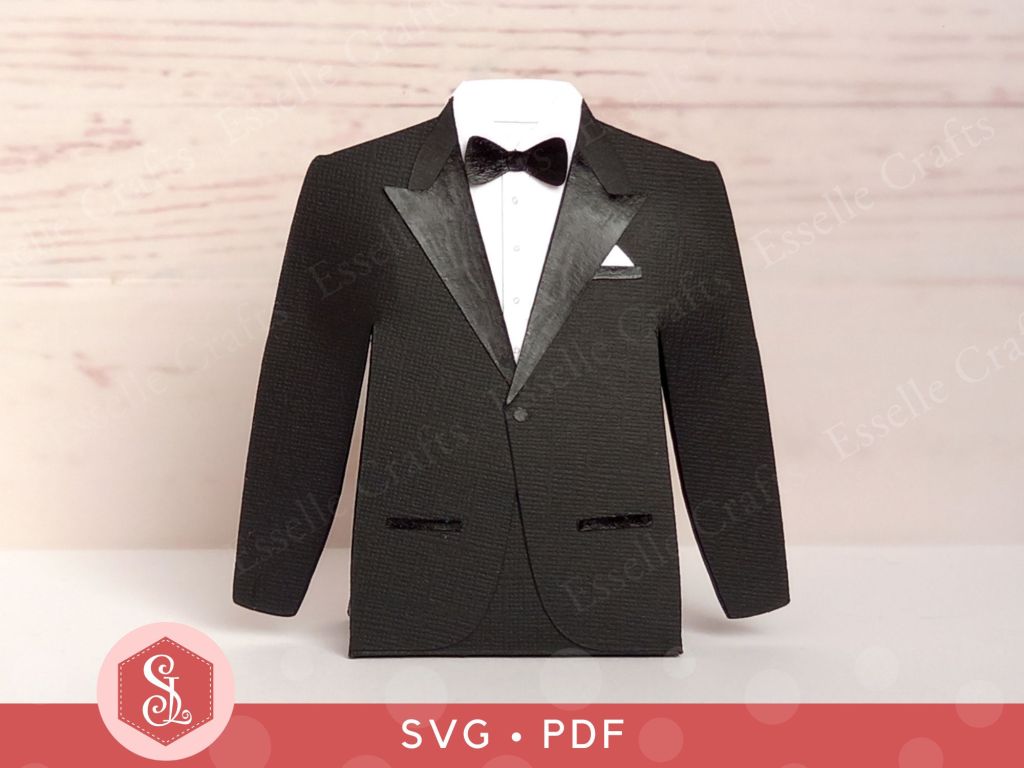
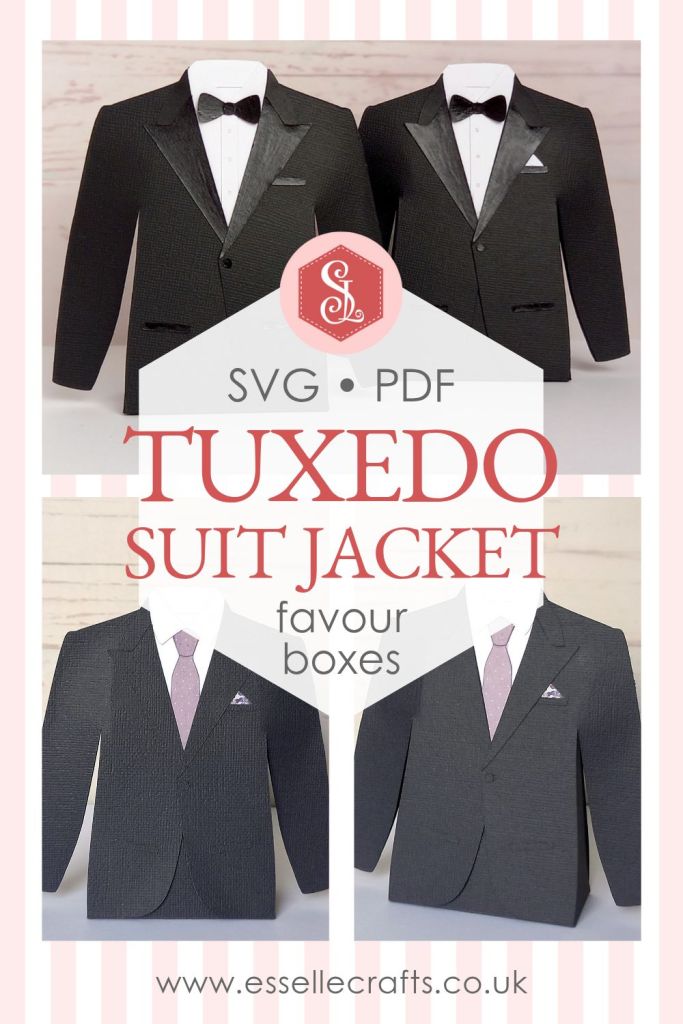
I have just updated my Tuxedo Favour Box template to include a regular tie as well as the bow tie. This means that you can now use the template to make a smart suit jacket box!
You can make the suit jacket box using any coloured or patterned cardstock you like. You could even personalise it for a wedding or other special occasion using a particular colour scheme. And how about adding a matching tie and handkerchief! The possibilities are endless!
Remember, if you are making the tuxedo box, I recommend coating the lapels, pocket trims, button and bow tie pieces with clear acrylic gloss varnish to create that iconic satin finish, or alternatively use a black satin finish cardstock.
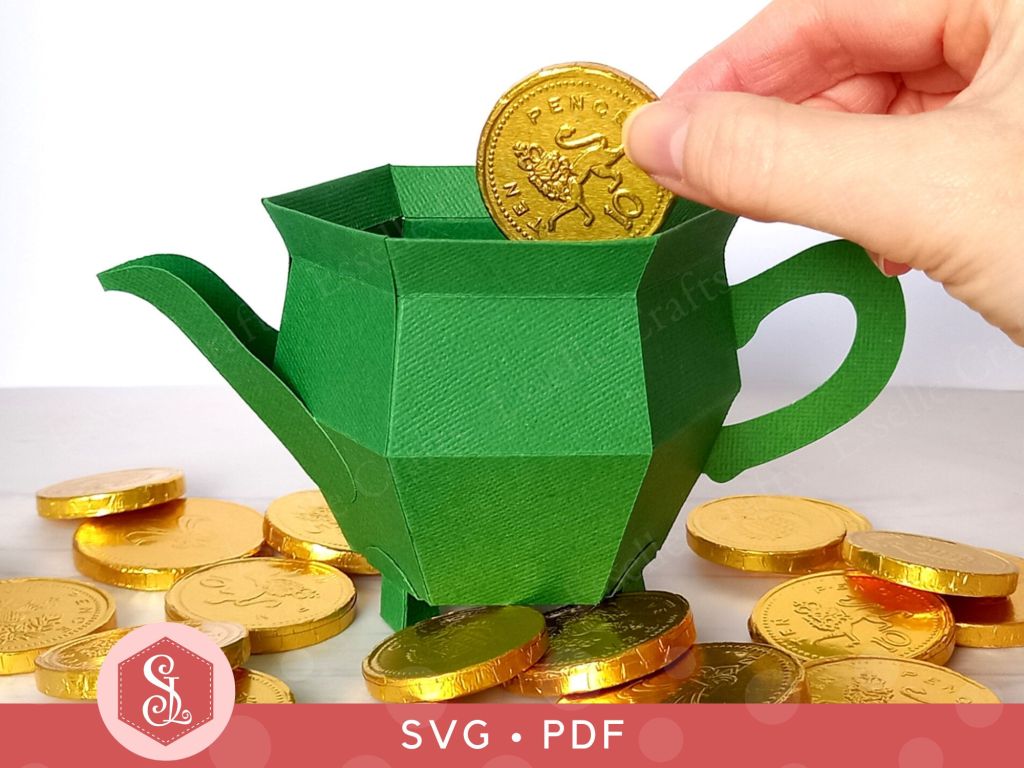
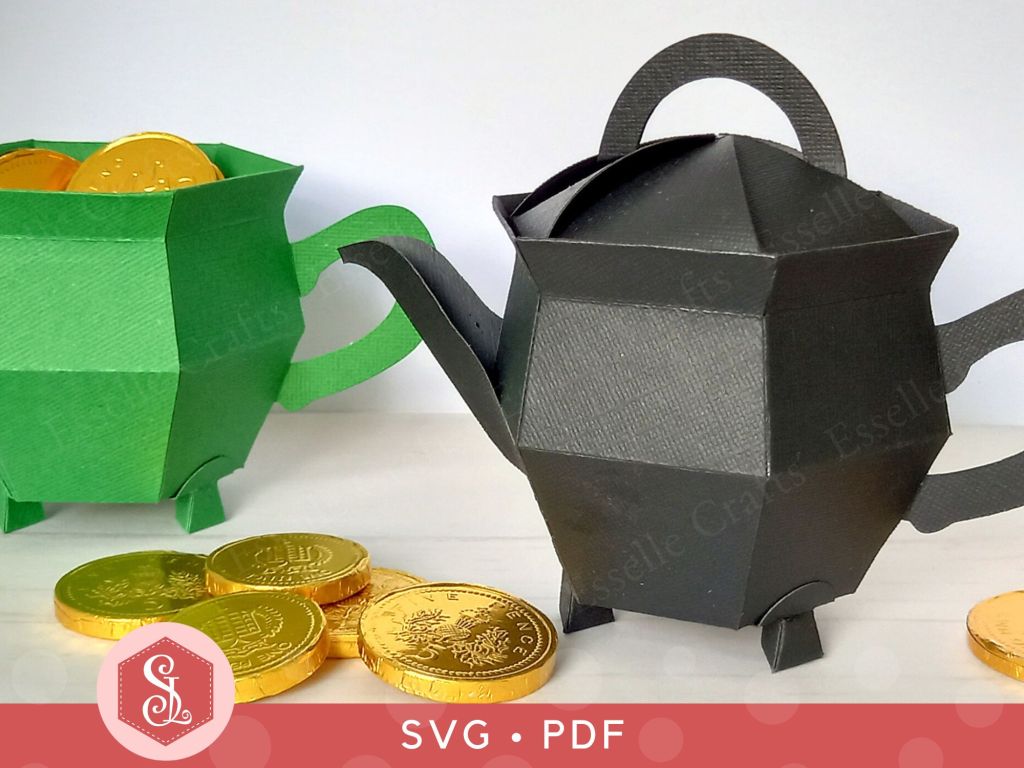
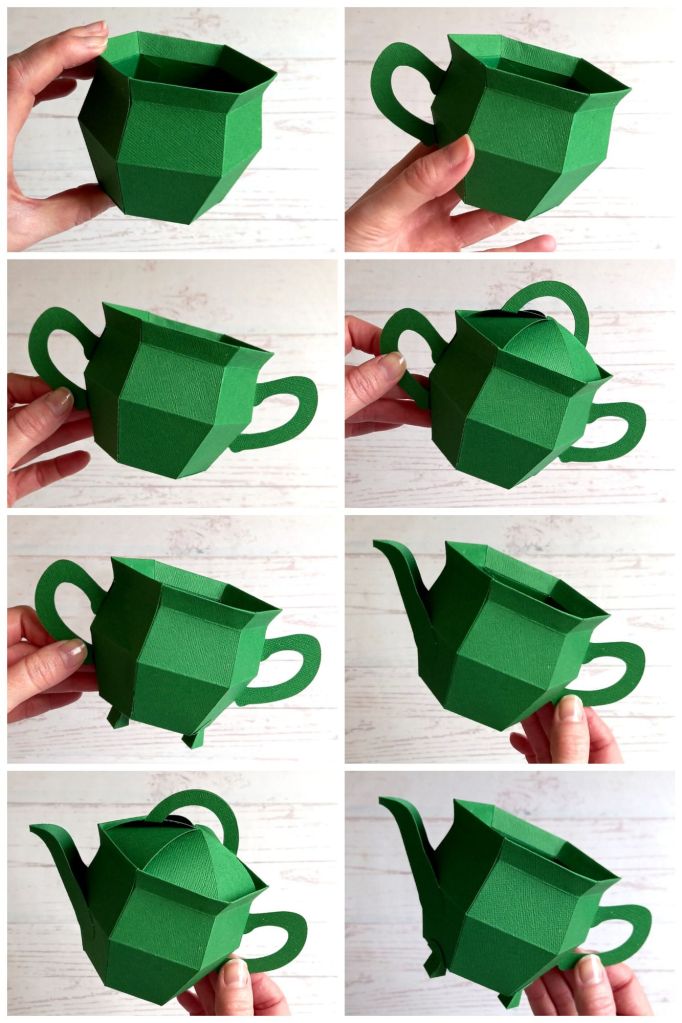
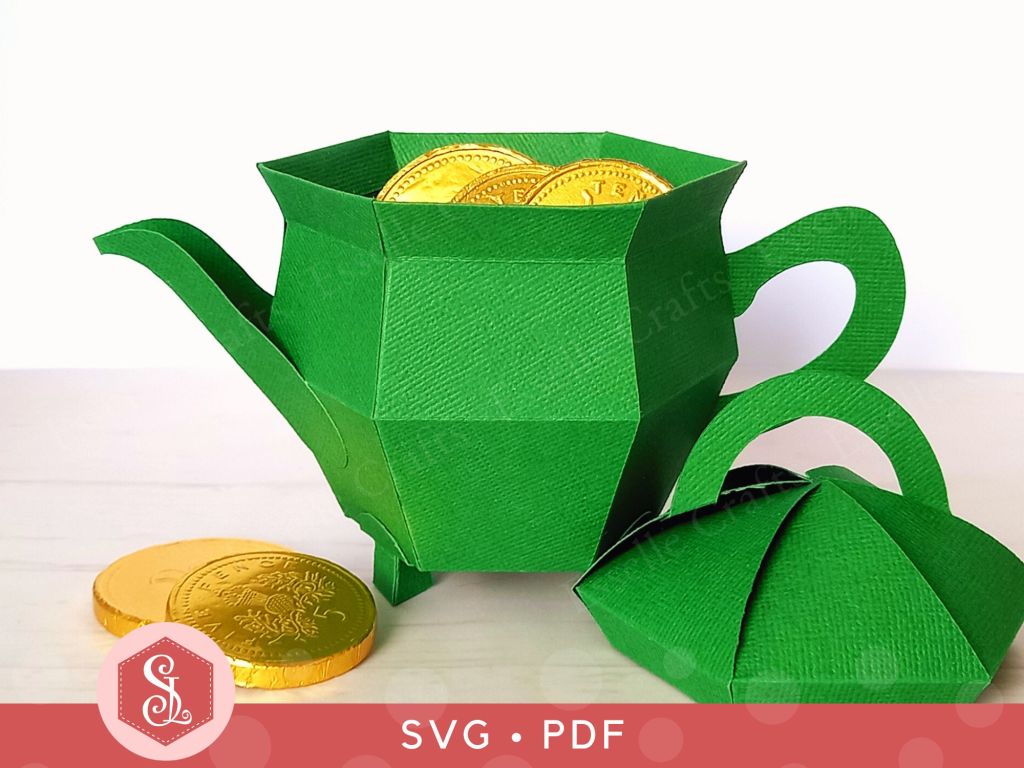
It’s time for another teapot favour box design and, although we’re nowhere near Halloween, I’ve created this one in the form of a witch’s cauldron!
But then, with St. Patrick’s Day on the horizon, I thought it would also work well as a lucky pot of gold!
The templates to make this favour box come in both SVG and PDF format, making them accessible for a variety of crafting needs.
To make one, you will need:
* Cauldron Teapot Box template (SVG and PDF available) * Computer and printer to print the PDF templates and instructions * Digital cutting machine * Double-sided cardstock (220-250gsm / 80-92lb recommended) * Craft glue / double-sided tape
If you are not using a cutting machine you will also need: * Craft knife / scissors * Scoring tool * Ruler
Watch my video tutorial showing how to assemble the box, and be sure to follow the tips below:
TIP 1 : When attaching the side handle, make sure that it is lined up in the centre.
TIP 2 : Once the lid is assembled, apply a small dot of glue to the centre (underneath) to help hold its position.
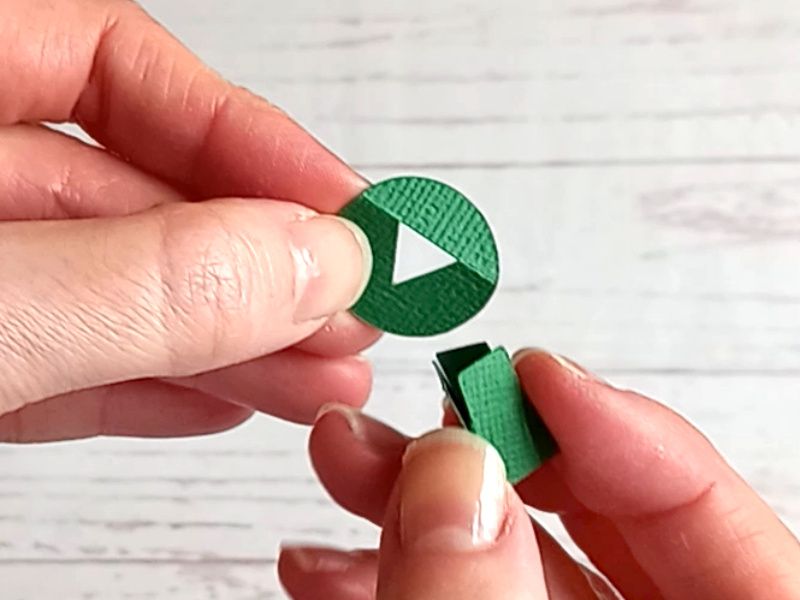
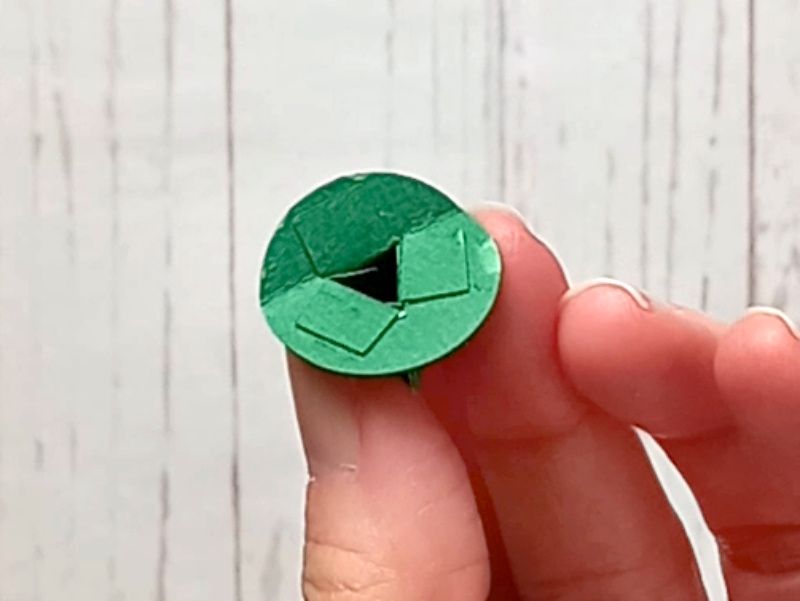
TIP 3 : Push the assembled triangular foot through the outside (textured side) of the circular foot holder, then glue the three tabs down to secure it in place.
There are many different ways that you can style your little pot of gold / cauldron boxes. Here are some examples:
Once assembled, your little pot of gold / cauldron teapot box will hold a range of delicious treats, making it the perfect gift box for St Patrick’s Day celebrations or for spooky Halloween surprises!
What will you fill your little boxes with? Let me know in the comments below!
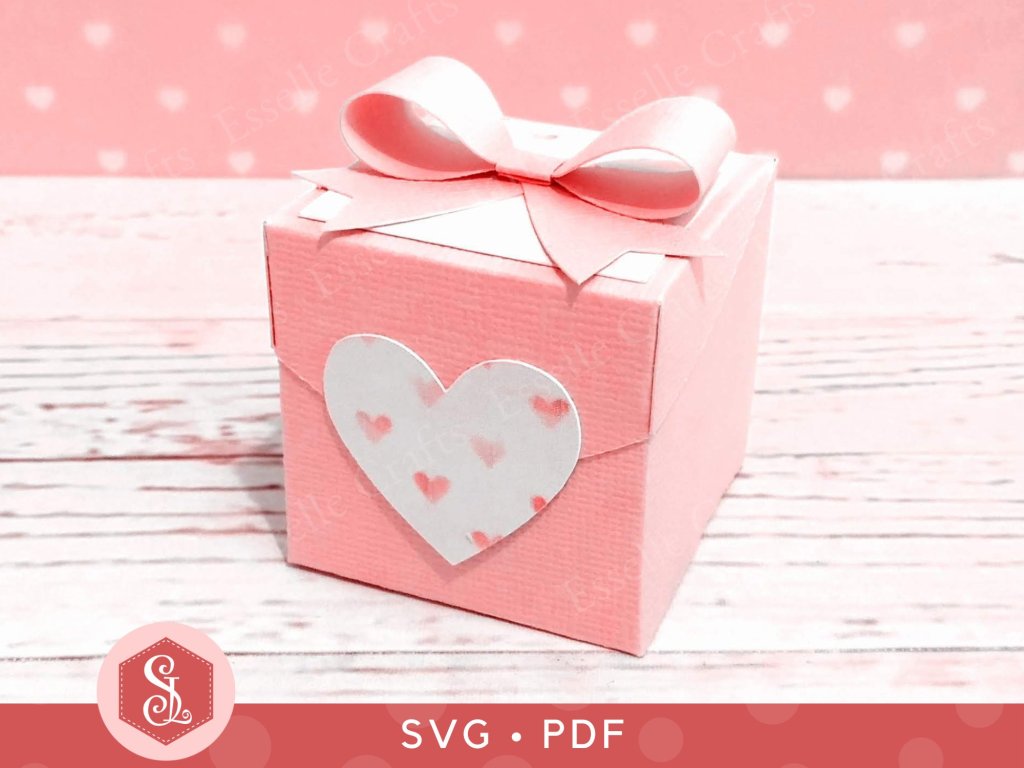
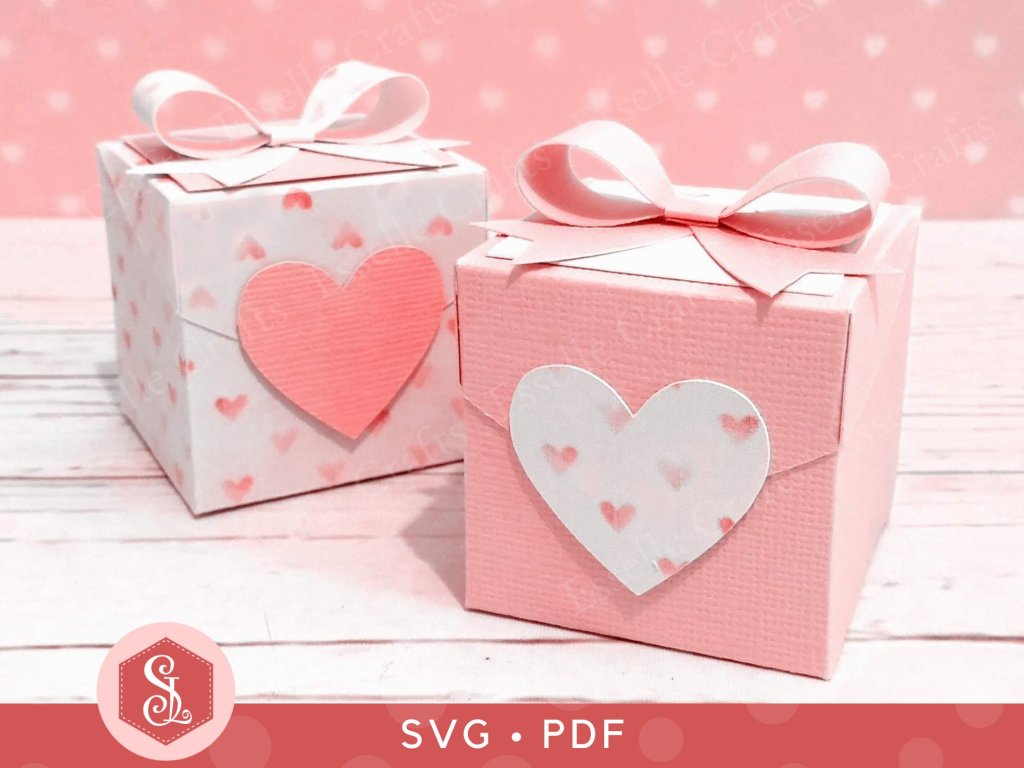
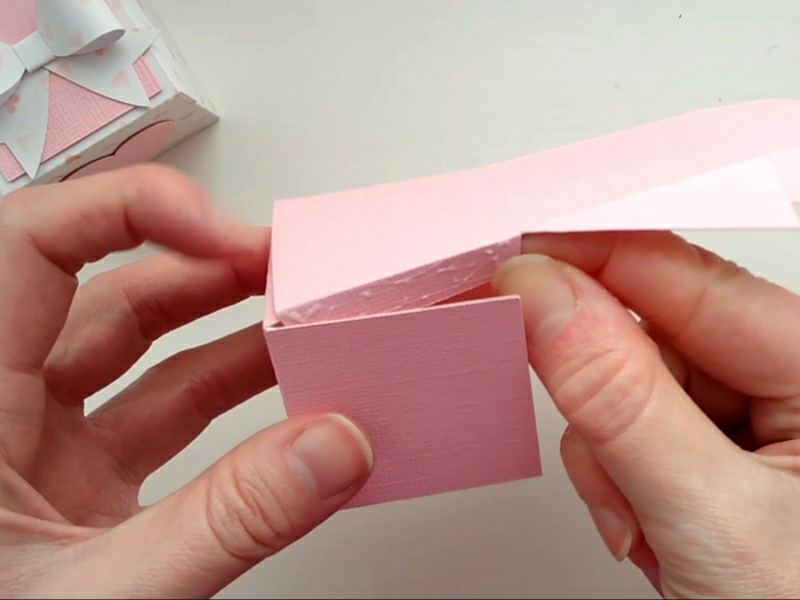
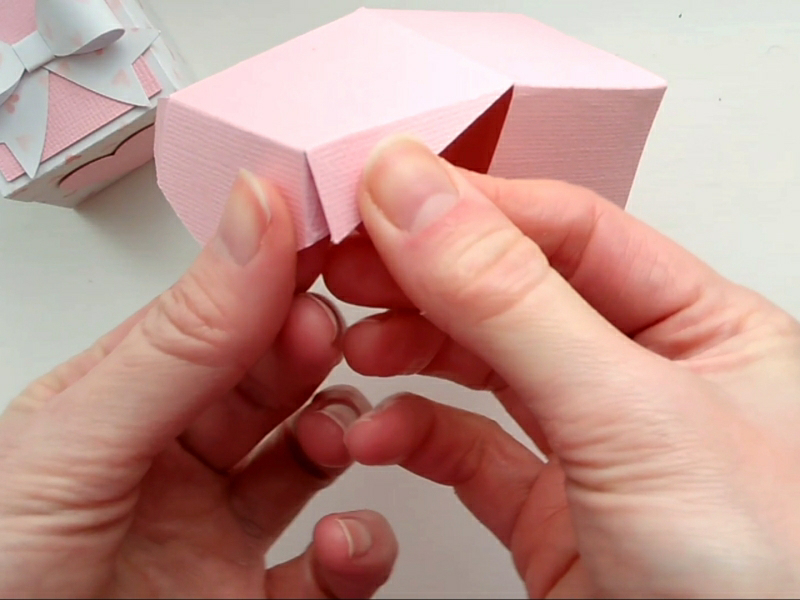
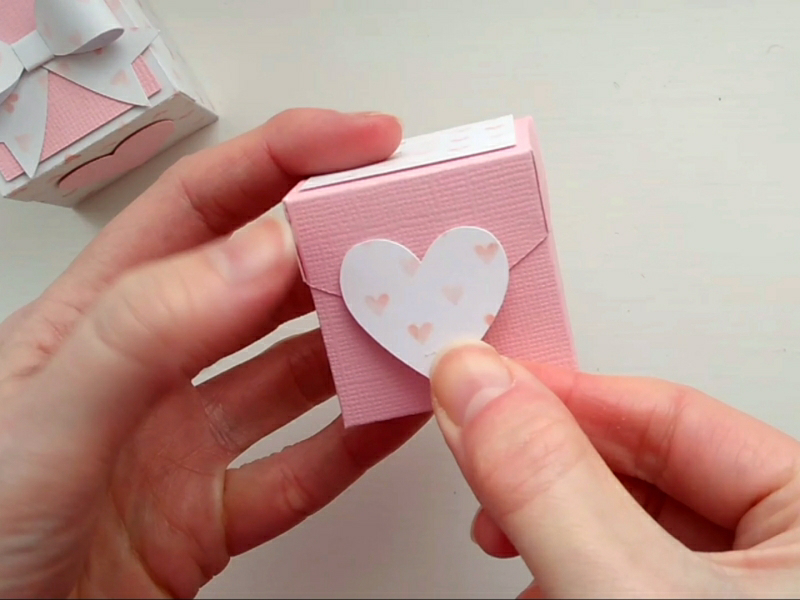
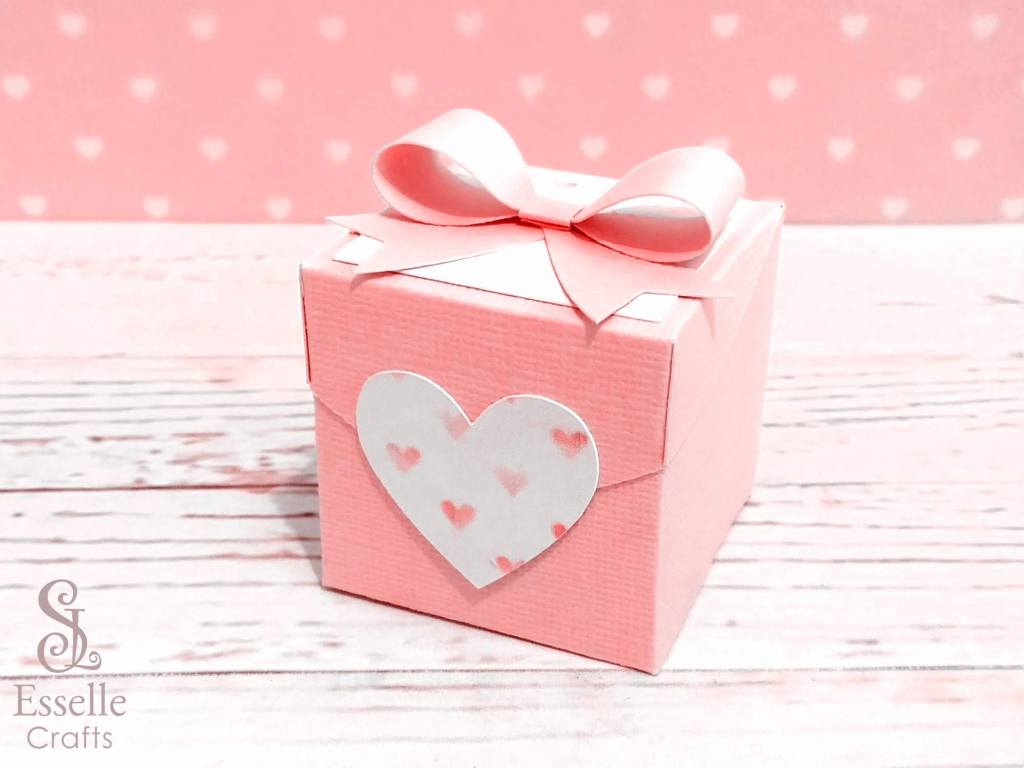
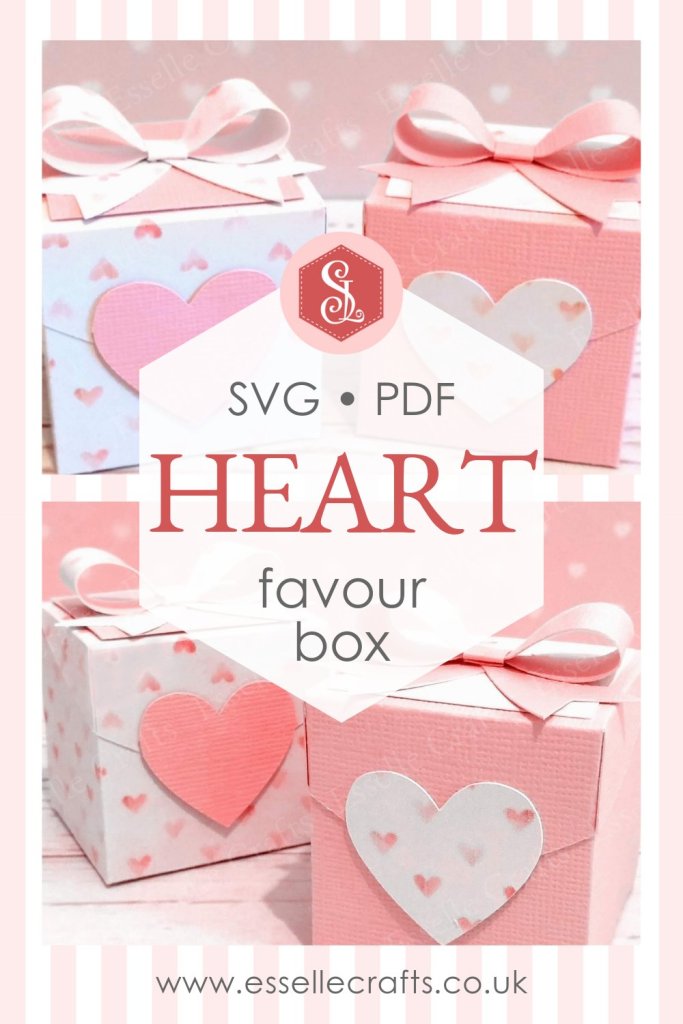
This adorable little heart favour box has an envelope-style lid and can be filled to the brim with sweets or small treats. Easy to assemble, it is perfect for Valentine’s Day, wedding table favours, bridal showers and so much more!
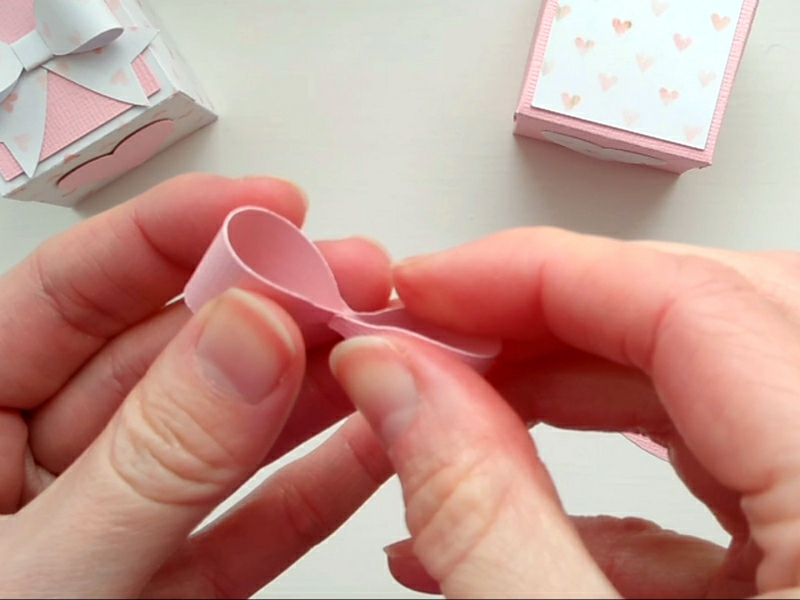
Complete with a heart and a cute paper bow, the templates for this box come in both SVG and PDF format, making them accessible for a variety of crafting needs.
To make one, you will need:
* Heart Favour Box template (SVG and PDF available) * Computer and printer to print the PDF template and instructions * Digital cutting machine * Double-sided cardstock / patterned card (220-250gsm / 80-92lb recommended) * Lighter, double-sided card or paper for the bow (160-220gsm / 60-80lb recommended) * Craft glue / double-sided tape
If you are not using a cutting machine you will also need:
* Craft knife / scissors * Scoring tool * Ruler
Watch my video tutorial showing how to assemble the box, and be sure to follow the tips below:
TIP 1 : Start by assembling the base of the box, then move onto the lid.
TIP 2 : Use foam pads or small scraps of cardstock for added dimension under the heart and square panel.
TIP 3 : Before assembling the paper bow, loop both ends of the curved piece around a pencil or use a bone folder. This will make it easier to get it into the correct shape.
Once the box is finished, it’s ready to be filled with little treats and given to that special someone in your life!
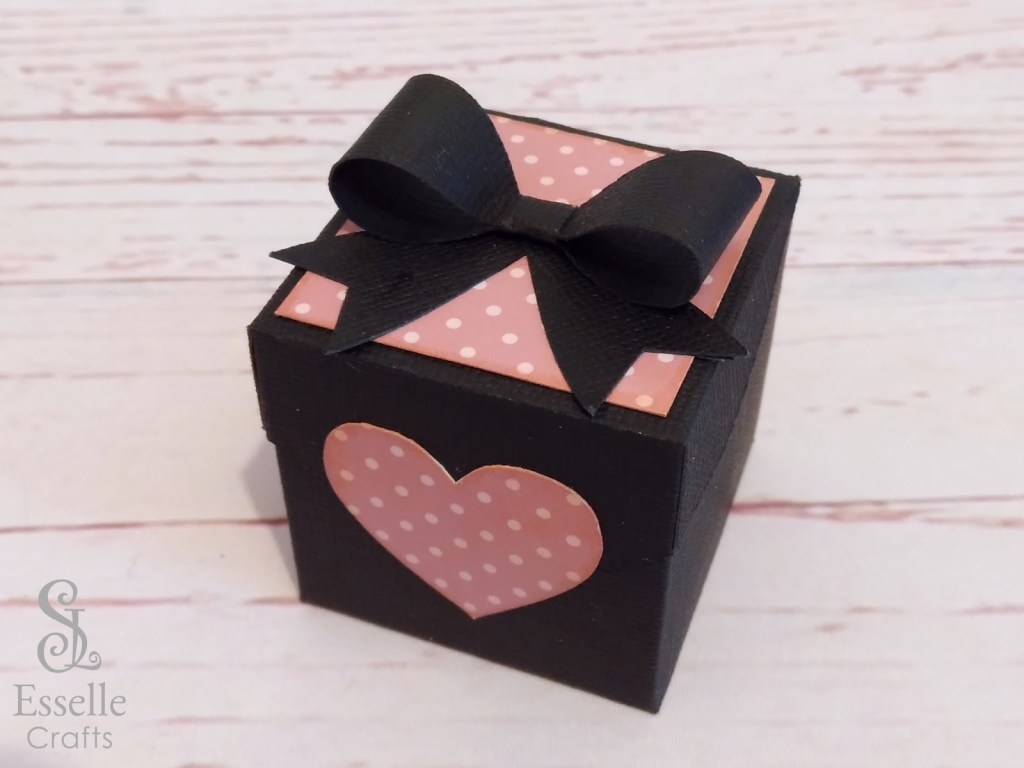
The box can easily be customized for any occasion, so try experimenting with different colour combinations or themes. I really like how this black and pink version turned out ❤️
Which colour combination or theme will you choose?
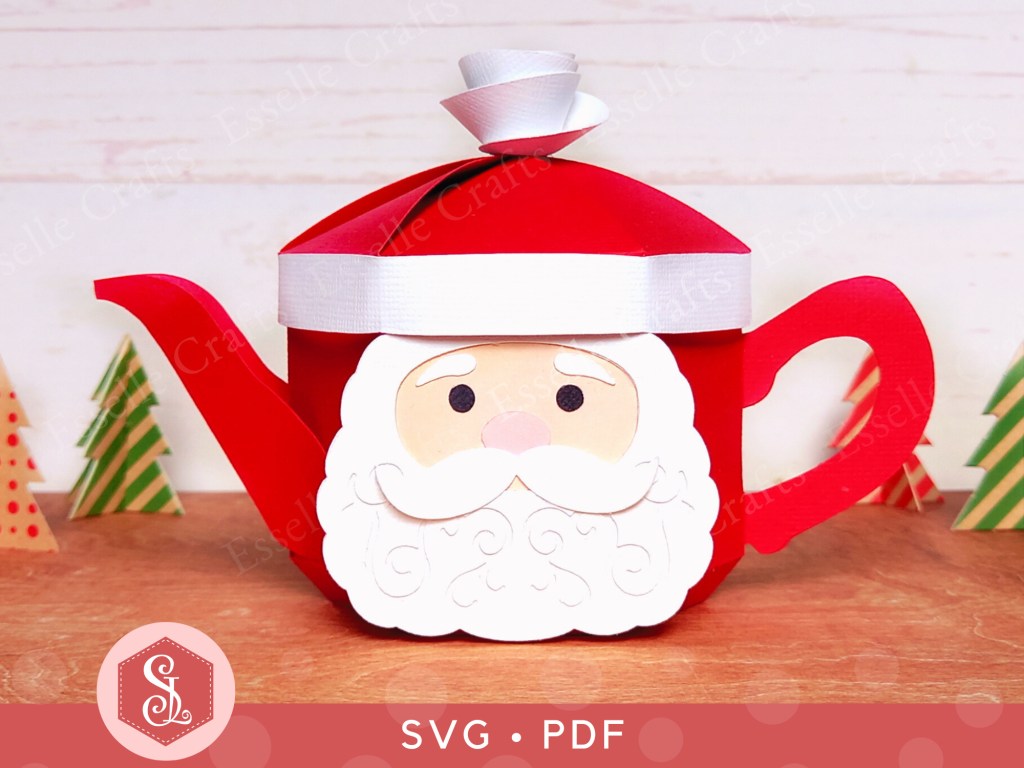
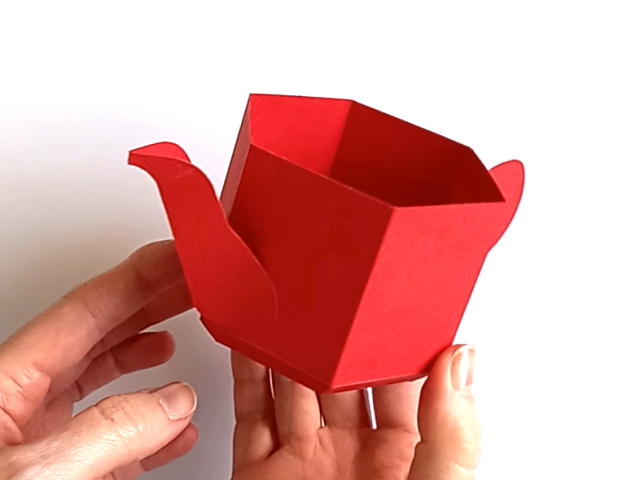
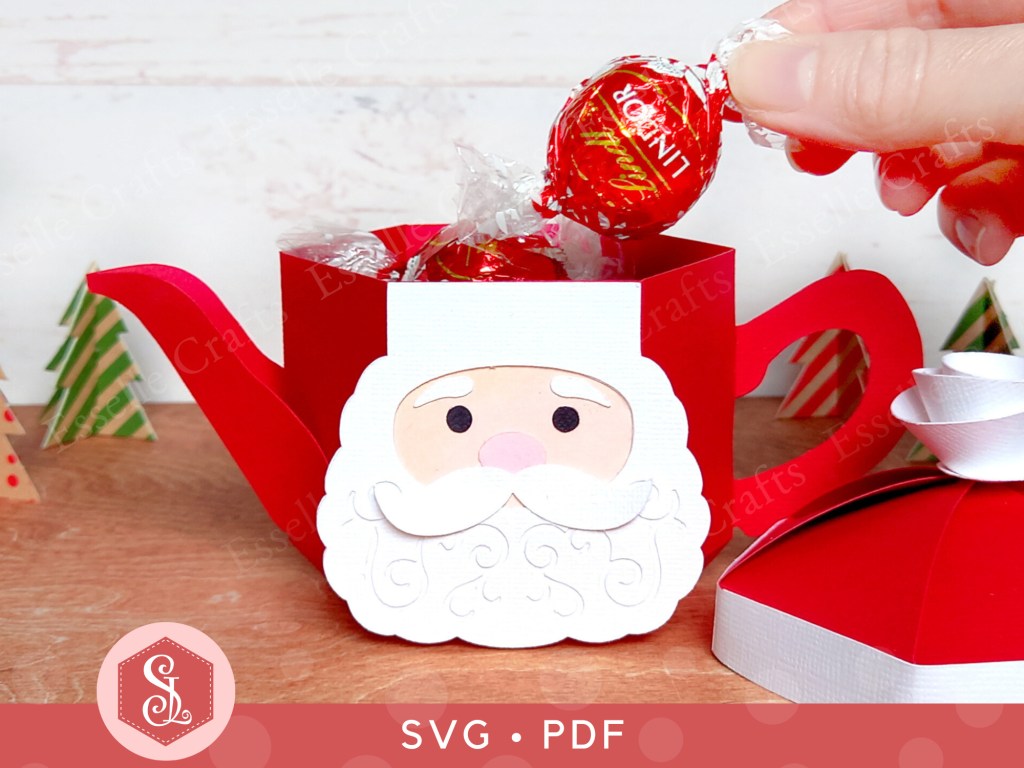
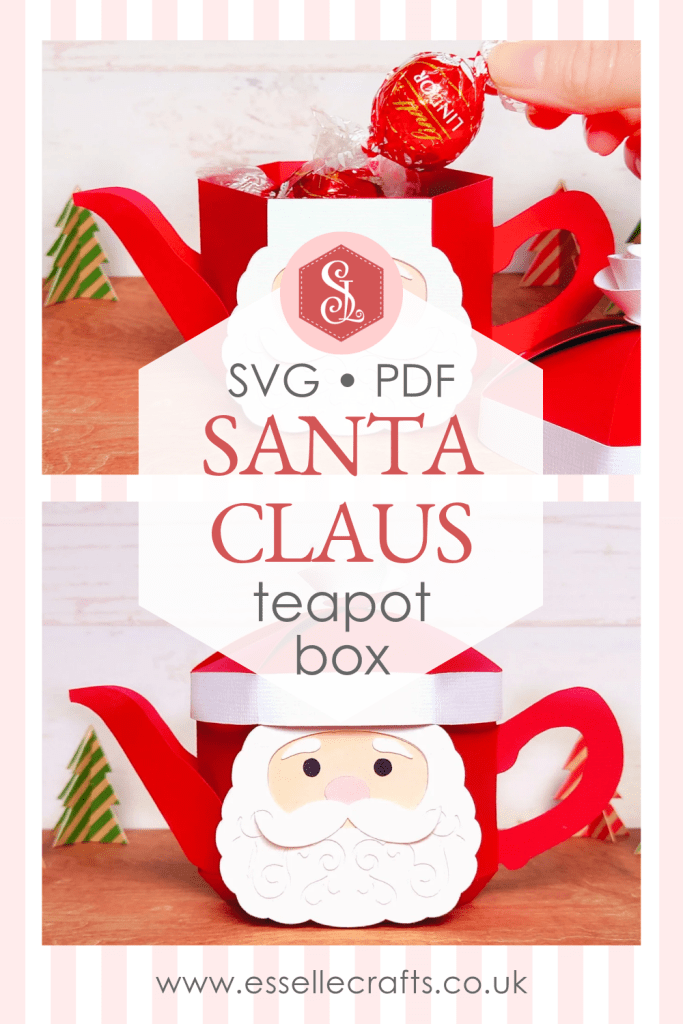
It’s time for another teapot favour box design and, with Christmas fast approaching, I’ve created this one in the style of Santa Claus! 🎅🏻
Doesn’t he look jolly! With a big, textured beard and a festive hat that doubles up as the lid, you’re going to have such fun arranging his features and filling it with all sorts of delicious Christmas treats!
The templates come in both SVG and PDF format, making them accessible for a variety of crafting needs.
To make one, you will need:
* Santa Claus Teapot Box template (SVG and PDF available) * Computer and printer to print the PDF templates and instructions * Digital cutting machine * Double-sided cardstock (220-250gsm / 80-92lb recommended) * Craft glue / double-sided tape
If you are not using a cutting machine you will also need: * Craft knife / scissors * Scoring tool * Ruler
Watch my video tutorial showing how to assemble the teapot box, and be sure to follow the tips below:
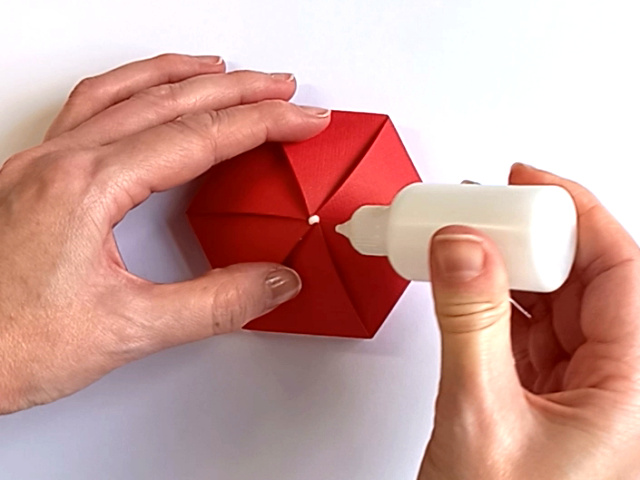
TIP 1 : Assemble the main teapot pieces first before adding any of the features.
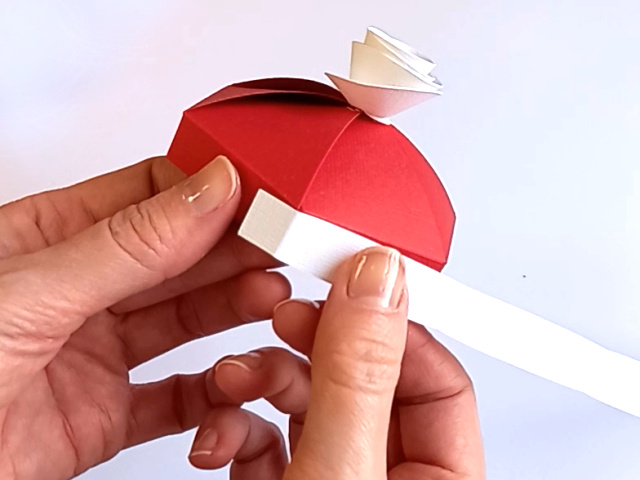
TIP 2 : Once the lid is assembled, apply a small dot of glue to the centre to help it hold its position. The rose on top will cover this when it’s positioned correctly.
TIP 3 : Join the two white hat trim pieces together using one of the small tabs. This can then be glued to the lid by lining up the score line against one of the lid joins and wrapping it around the lid. You may need to trim off some excess at the end, depending on the weight of your cardstock.
TIP 4 : Join the two beard pieces together so that the one with the cut out design is on top and they both line up at the base. You can then attach the face panel to the back (lining up the top edge between the two corners) and add the features. I recommend curling up his moustache at the ends for added dimension!
TIP 5 : When attaching the face to the front of the teapot, carefully line it up along the top edge.
Once assembled, your little teapot box will hold eight of these Lindt chocolates, making it perfect for table favours and Christmas parties! 🎅🏻
But what will you fill your little Santa Claus teapot boxes with? Let me know in the comments below!
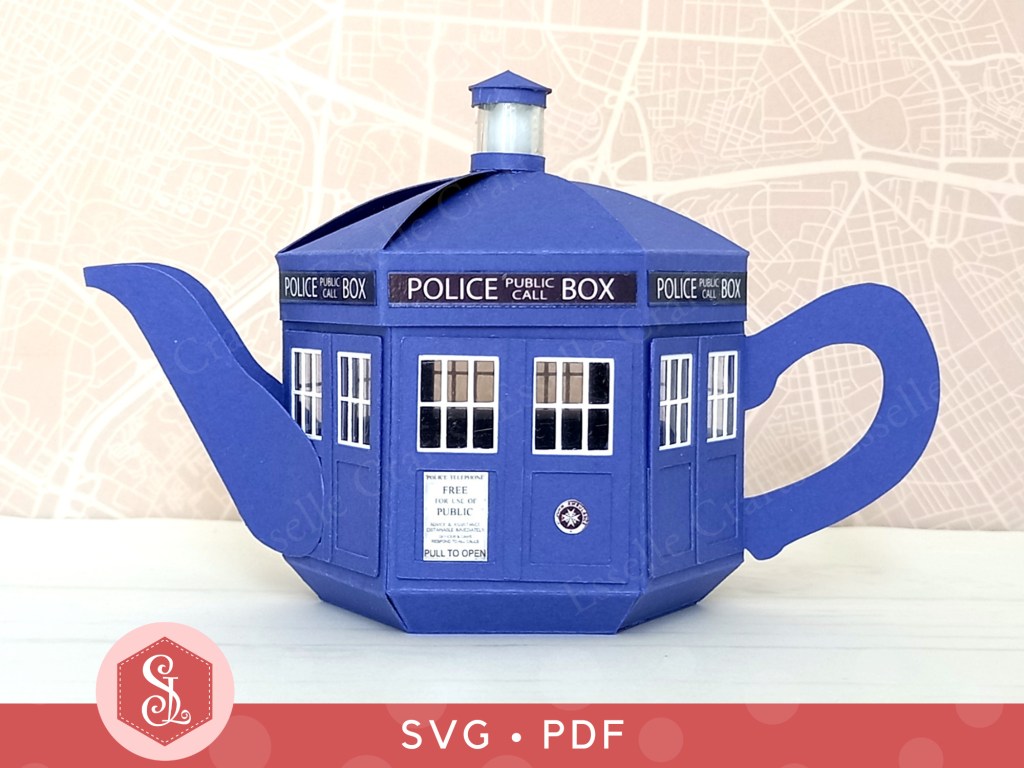
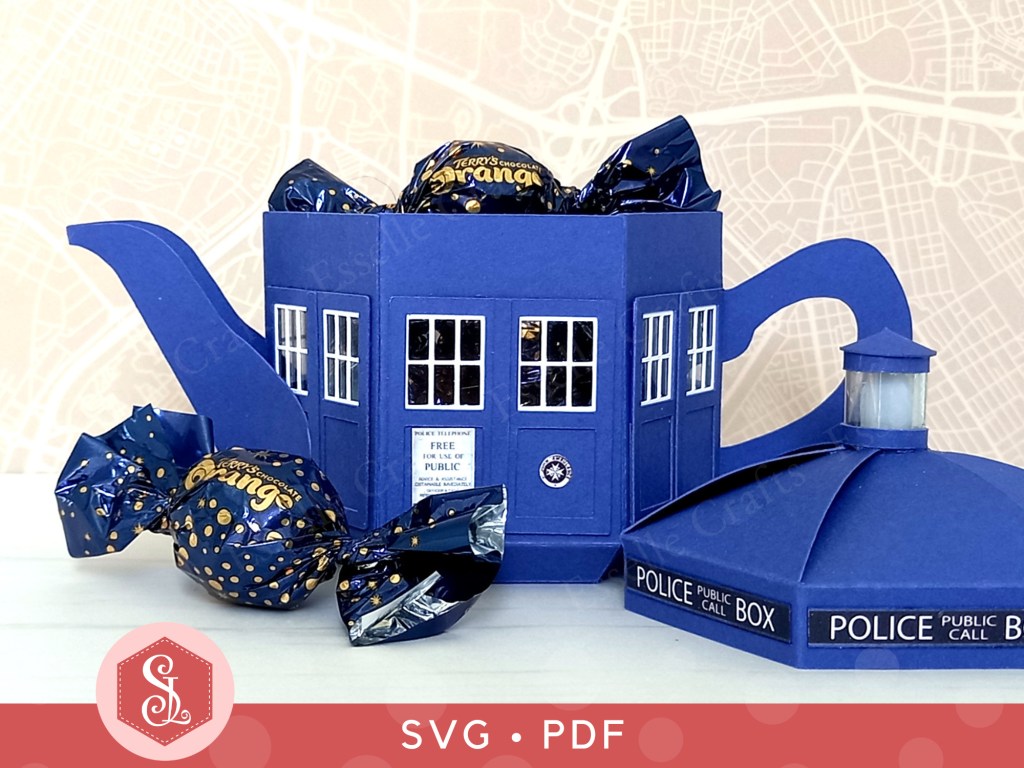
This impressive POLICE BOX Teapot Box seemed like the obvious next step after designing my Red Telephone Teapot Box. Again, it took a bit of trial and error to work it all out, but I’m so pleased with how it looks 💙
I created my first POLICE BOX teapot box back in 2014. Back then, I cut everything out by hand, including all of the little panel pieces and signs, which proved to be quite fiddly to say the least!
Now, travelling forwards in time to 2024 (do you see what I did there?), I was able to cut my new version out using my lovely Cricut cutting machine 💙
The templates for this box are available in my Etsy shop as SVG cut files, as well as printable PDF files if you prefer to cut out by hand.
To make one, you will need:
* POLICE BOX Teapot Box template (SVG and PDF available) * Computer and printer to print the PDF templates and instructions * Digital cutting machine * Double-sided cardstock (220-250gsm / 80-92lb recommended) * Thin acetate (and vellum is optional) * White glossy photo quality paper * Craft glue * Double-sided tape / red liner tape
If you are not using a cutting machine you will also need:
* Craft knife / scissors * Scoring tool * Ruler
Watch my video tutorial showing how to assemble the teapot box, and be sure to follow the tips below:
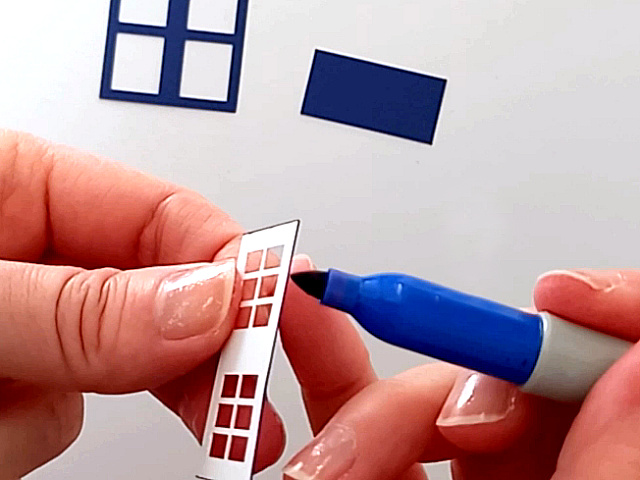
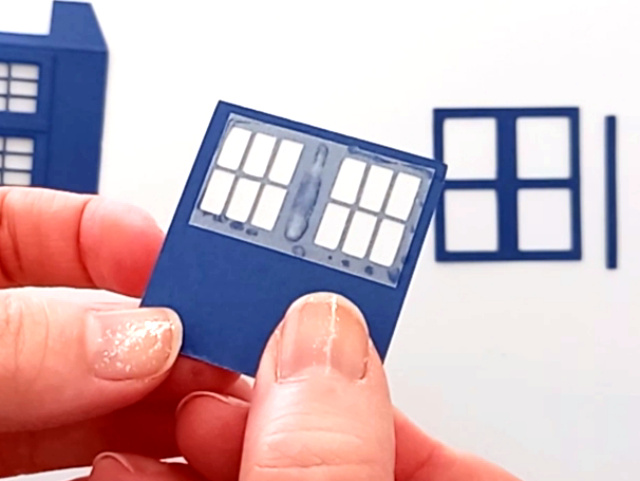
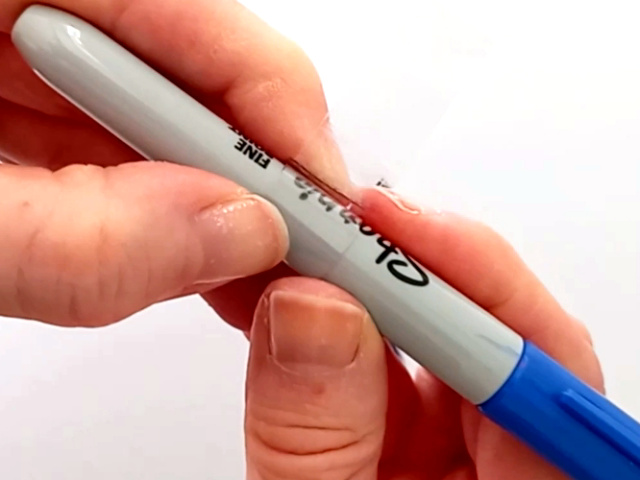
TIP 1 : You can choose to have either blue or white window frames, but if you use white cardstock, then you will need to colour the outer edges of the frame first with dark blue ink (I used a Sharpie for mine). This is so that the edges don’t show once the box is assembled.
TIP 2 : You can choose to have either vellum or acetate for the window panes, depending on how you want your box to look and whether you want to be able to see inside it. If you use vellum, you should be able to attach them to the window frames using glue, but for acetate you will need to use strong double-sided / red liner tape.
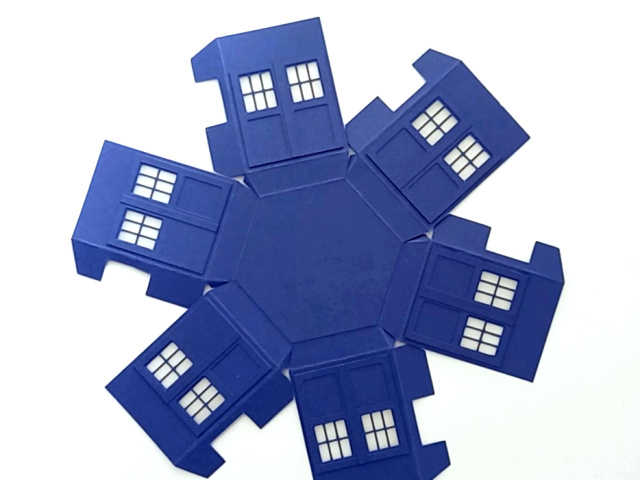
TIP 3 : Assemble the six side panels and attach them in place before assembling the teapot. It’s much easier to line the windows up whilst it’s flat.
TIP 4 : The top of the lid needs to be flat, so apply a little glue around the curved tops and press them down to create a little cut-out circle. Using a round pencil in the hole will help the lid to retain its shape whilst doing this.
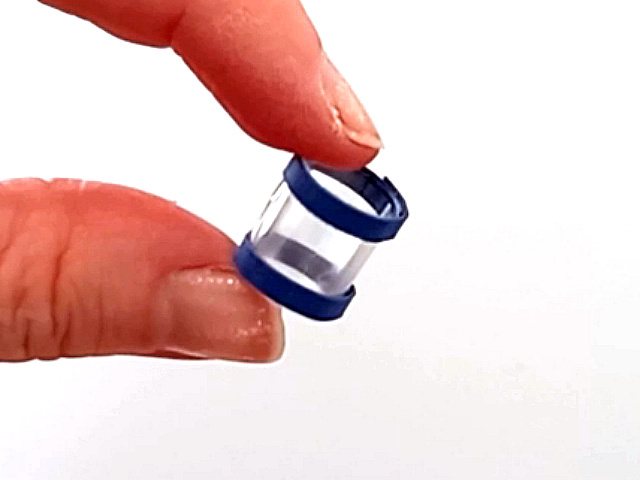
TIP 5 : Wrap the thin acetate strip around a pen (a Sharpie is the perfect size for this) and seal it with clear sticky tape. The thin blue strips can then be attached using double-sided / red liner tape.
It’s a definite improvement to the first one that I made and, whilst it was still a little time-consuming, I am really pleased with how it has turned out. It will hold a good amount of sweet treats (sadly it’s not bigger on the inside 😉) and can be kept on display afterwards.
But, wait, there’s more …
The small circle in the lid is just large enough for the ‘flame’ part of a battery operated tealight to fit through from underneath. Not all battery operated tea lights will fit in the hole, but quite a few will. If you can’t find one that fits well, simply put a couple of lights in the base and the top will still light up. You can then display it on a shelf or a windowsill.
It’s just another little detail that makes this teapot box extra special 💙